React
初步了解
React是一个JS库,Vue是一个JS框架,React目的和定位是针对界面的打造,React对代码的封装程度较低,JS使用灵活,对JS侵入小;Vue对JS侵入性很高,将各种处理方法封装成Vue特有的执行方式,用起来方便但是针对灵活的需求时会有所捉襟见肘。
Hello World
直接在index.html页面上使用React,引用下面的JS
1
2
3
4
5
6
| // React核心库,与宿主环境无关
<script crossorigin src="https://unpkg.com/react@16/umd/react.development.js"></script>
// 依赖核心库,将核心的功能与页面结合,如果是手机端的RN就不需要这个了,只需要核心库就行
<script crossorigin src="https://unpkg.com/react-dom@16/umd/react-dom.development.js"></script>
// 对JSX语法的转译
<script src="https://unpkg.com/babel-standalone@6/babel.min.js"></script>
|
如果不加crossorigin,跨域或者什么原因报错了,不会返回详细信息。
React.createElement
React.createElement是核心库里提供的方法,不要使用document.createElement
创建一个React元素,称作虚拟DOM,本质上是一个对象
- 参数1:元素类型,如果是字符串,一个普通的
HTML元素
- 参数2:元素的属性,一个对象
- 后续参数:元素的子节点
1
2
3
4
5
6
7
8
9
10
11
| var span = React.createElement("span", {}, "span元素");
var h1 = React.createElement(
"h1",
{
title: "第一个React元素",
},
"HELLO",
",",
"WORLD",
span
);
|
React.createElement创建完元素后,使用ReactDOM.render(h1,document.getElementById("root"))完成转换成真实DOM对象,如下
1
2
3
| import ReactDOM from "react-dom";
ReactDOM.render(h1, document.getElementById("root"));
|
上面的情况在react-dom@18.2.0之后做了变化,改为以下的方式创建DOM对象
1
2
3
| import { createRoot } from "react-dom/client";
createRoot(document.getElementById("root")).render(h1);
|
虽然用之前的方式现在会报Warning信息,但是内容还是可以正常展示
具体可见:https://github.com/reactwg/react-18/discussions/5
JSX
JS的扩展语法,需要使用babel进行转义。
加上babel转译的库后,可以直接写:
1
2
3
4
5
6
7
8
9
10
11
| // 对JSX语法的转译
<script src="https://unpkg.com/babel-standalone@6/babel.min.js"></script>
<script type="text/babel">
var h1 = (
<h1 title="一个h1元素">
Hello,World<span>一个span元素</span>
</h1>
);
ReactDOM.render(h1, document.getElementById("root"));
</script>
|
注意:这里script里需要加上 type="text/babel"告诉里面的内容需要被babel转译
使用脚手架搭建配置
官方:create-react-app
1
| yarn create react-app 工程名称
|
第三方:next.js、umijs
凡是使用JSX的文件,必须导入React
VSCode配置
emmet配置:
1
2
3
| "emmet.includeLanguages": {
"javascript": "javascriptreact"
}
|
VSCode插件安装
ESLint:代码风格检查ES7 React/Redux/GraphQL/React-Native snippets:快速代码编写
Chrome插件安装
React Developer Tools
JSX
什么是JSX
Facebook起草的JS扩展语法- 本质是一个
JS对象,会被babel编译,最终会被转换为React.createElement
- 每个
JSX表达式,有且仅有一个根节点
- 如果需要有两个根节点,可以使用
React.Fragment(使用<></>包裹,这个是<React.Fragment></React.Fragment>语法糖)
1
2
3
4
5
6
7
8
9
| const h1 = (
<>
<h1 title="一个h1元素">
Hello,World<span>一个span元素</span>
</h1>
<h2>h2</h2>
</>
);
ReactDOM.render(h1, document.getElementById("root"));
|
在JSX中嵌入表达式
1
2
3
4
5
6
7
8
9
10
11
12
| import React from "react";
import ReactDOM from "react-dom";
const a = 1298;
const b = 284;
const h1 = (
<h1>
{a}*{b}={a * b}
</h1>
);
ReactDOM.render(h1, document.getElementById("root"));
|
相当于下面:
1
2
3
| const h = React.createElement("h1", {}, `${a}*${b}=${a * b}`);
ReactDOM.render(h, document.getElementById("root"));
|
在JSX中使用注释
将表达式作为内容的一部分
null、undefined、false不会显示- 普通对象,不可以作为子元素
1
2
3
4
5
6
|
const obj = {
a: 1,
b: 2,
};
const h = <h2>{obj}</h2>;
|
1
2
| const obj = <h>h元素</h>;
const h = <h2>{obj}</h2>;
|
1
2
3
4
| const numbers = new Array(20);
numbers.fill(0);
const list = numbers.map((item, index) => <li key={index}>{index}</li>);
const h = <ul>{list}</ul>;
|
将表达式作为元素属性
1
2
3
4
5
6
7
| const url = "xxxx";
const cls = "xxxx";
const div = (<div>
<img src={url} className={cls} style={{
width: "100px";
}} />
</div>)
|
元素的不可变性
- 虽然
JSX元素是一个对象,但是该对象中的所有属性不可更改(使用了object.freeze())
- 如果确实需要更改元素的属性,需要重新创建
JSX元素(并不会浪费性能,因为重新创建JSX元素时,是重新创建对象,并不是每次都重新删除DOM重新创建,他只会改变DOM中改变的内容)
组件和组件属性
组件:包含内容、样式和功能的UI单元
创建一个组件
特别注意:组件的名称首字母必须大写
- 函数组件
返回一个React元素
1
2
3
4
5
6
7
8
9
10
11
12
13
| import React from "react";
import { createRoot } from "react-dom/client";
import src1 from "./assets/1.jpg";
import "./index.css";
const container = createRoot(document.getElementById("root"));
function MyComp() {
return <img src={src1} alt=""></img>;
}
const comp = <MyComp />;
container.render(<div>{comp}</div>);
|
- 类组件
必须继承React.Component
必须提供render函数,用于渲染组件
1
2
3
4
5
6
7
8
9
10
11
12
13
14
15
16
17
18
19
20
21
22
23
24
25
26
27
28
29
30
31
|
import React from "react";
import src2 from "./assets/2.jpg";
export default class MyClassComp extends React.Component {
render() {
return (
<div>
类组件内容:<img src={src2} alt=""></img>
</div>
);
}
}
import React from "react";
import { createRoot } from "react-dom/client";
import { MyComp } from "./MyComp";
import MyClassComp from "./MyClassComp";
import "./index.css";
const container = createRoot(document.getElementById("root"));
const comp = <MyComp />;
const classComp = <MyClassComp />;
container.render(
<div>
{comp}
{classComp}
</div>
);
|
组件的属性
- 对于函数组件,属性会作为一个对象的属性,传递给函数的参数
- 对于类组件,属性会作为一个对象的属性,传递给构造函数的参数
1
2
3
4
5
6
7
8
9
10
11
12
13
14
15
16
17
18
|
import React from "react";
import src1 from "./assets/1.jpg";
export function MyFuncComp(props) {
return (
<div>
函数组件内容:<img src={src1} alt=""></img>
<div>
传入的数字是:
<span>{props.number}</span>
</div>
</div>
);
}
<MyFuncComp number="2" />;
|
1
2
3
4
5
6
7
8
9
10
11
12
13
14
15
16
17
18
19
20
21
22
23
24
25
|
import React from "react";
import src2 from "./assets/2.jpg";
export default class MyClassComp extends React.Component {
constructor(props) {
super(props);
console.log(props);
}
render() {
return (
<div>
类组件内容:<img src={src2} alt=""></img>
<div>
传入的数字是:
<span>{this.props.number}</span>
</div>
</div>
);
}
}
const classComp = <MyClassComp number="3" enable obj={{ name: "yy", age: 25 }} ui={<div>这是传递的属性</div>}/>;
|
注意:组件的属性,应该使用小驼峰命名法
组件无法改变自身的属性。
之前学习的React元素,本质上,就是一个组件(内置组件)
React中的哲学:数据属于谁,谁才有权力改动
React中的数据,自顶而下流动
组件状态
组件状态:组件可以自行维护的数据
组件状态仅在类组件中有效
状态(state),本质上是类组件的一个属性,是一个对象
状态初始化
状态的变化
不能直接改变状态:因为React无法监控到状态发生了变化
如下,在子组件中直接对数据进行操作,并不会重新渲染界面
1
2
3
4
5
6
7
8
9
10
11
12
13
14
15
16
17
18
19
20
21
22
| import React, { Component } from 'react';
export default class Tick extends Component {
constructor(props) {
super(props);
this.state = {
left: this.props.number
};
this.timer = setInterval(() => {
if (this.state.left === 0) {
clearInterval(this.timer);
return;
}
this.state.left--;
}, 1000);
}
render() {
return <div>倒计时剩余:{this.state.left}</div>;
}
}
|
必须使用this.setState({})改变状态
一旦调用了this.setState,会导致当前组件重新渲染
1
2
3
4
5
6
7
8
9
10
11
12
13
14
15
16
17
18
19
20
21
22
23
24
25
26
27
28
29
30
31
32
33
34
35
36
37
38
39
40
|
import React, { Component } from 'react';
export default class Tick extends Component {
state = {
left: this.props.number
};
constructor(props) {
super(props);
this.timer = setInterval(() => {
if (this.state.left === 0) {
clearInterval(this.timer);
return;
}
this.setState({
left: this.state.left - 1
});
}, 1000);
}
render() {
return <div>倒计时剩余:{this.state.left}</div>;
}
}
import { createRoot } from 'react-dom/client';
import Tick from './components/Tick.jsx';
const container = createRoot(document.getElementById('root'));
const myTick = <Tick number={3} />;
container.render(<div>{myTick}</div>);
|
组件中的数据
- props:该数据是由组件的使用者传递的数据,所有权不属于组件自身,因此组件无法改变该数组
- state:该数组是由组件自身创建的,所有权属于组件自身,因此组件有权改变该数据
事件
在React中,组件的事件,本质上就是一个属性、函数
按照之前React对组件的约定,由于事件本质上是一个属性,因此也需要使用小驼峰命名法
1
2
3
4
5
6
7
8
9
10
11
12
13
14
15
16
17
18
19
20
21
22
23
24
25
26
27
28
| import React from 'react';
import { createRoot } from 'react-dom/client';
const btn = (
<button
onMouseEnter={(e) => {
console.log('鼠标移入了按钮,参数e是:', e);
}}
>
按钮
</button>
);
const container = createRoot(document.getElementById('root'));
container.render(btn);
|
组件内会在适当时机执行一些处理函数,使用组件时可以定义这些函数执行内容,例如:
1
2
3
4
5
6
7
8
9
10
11
12
13
14
15
16
17
18
19
20
21
22
23
24
25
26
27
28
29
30
31
32
33
34
35
36
37
38
39
40
41
42
43
44
45
46
47
48
49
50
51
52
53
54
55
56
57
58
59
60
61
62
63
64
65
|
import React, { Component } from 'react';
export default class Tick extends Component {
state = {
number: this.props.number || 0
};
constructor(props) {
super(props);
const timer = setInterval(() => {
if (this.state.number === 0) {
clearInterval(timer);
props.onOver && props.onOver();
return;
}
this.setState({
number: this.state.number - 1
});
}, 1000);
}
render() {
return <h1>倒计时:{this.state.number}</h1>;
}
}
import React, { Component } from 'react';
import Tick from './Tick';
export default class TickControl extends Component {
state = {
isOver: false
};
doOver = () => {
this.setState({
isOver: true
});
};
render() {
const initNumber = parseInt(Math.random() * 10);
const Ticks = <Tick onOver={this.doOver} number={initNumber}></Tick>;
let countDownState = '正在倒计时...';
if (this.state.isOver) {
countDownState = '倒计时结束!';
}
return (
<>
{Ticks}
<h1>{countDownState}</h1>
</>
);
}
}
|
以上简单实现了倒计时结束,界面信息改变。
如果没有特殊处理,在事件处理函数中,this指向undefined
- 使用bind函数,绑定this
- 使用箭头函数
1
2
3
4
5
6
7
8
9
10
11
12
13
14
15
16
17
18
19
20
21
|
constructor(props) {
super(props);
this.doOver = this.doOver.bind(this);
doOver() {
this.setState({
isOver: true
});
}
doOver = () => {
this.setState({
isOver: true
});
};
|
深入认识setState
setState,它对状态的改变,可能是异步的
如果改变状态的代码处于某个HTML元素的事件中,则其是异步的,否则是同步
如果遇到某个事件中,需要同步调用多次,需要使用函数的方式得到最新状态,如下:
1
2
3
4
5
6
| this.setState(cur => {
return {n: cur.n + 1}
})
this.setState(cur => {n: cur.n + 1})
|
使用第二个参数在箭头函数中实现同步
1
2
3
4
5
6
7
8
9
10
11
12
| this.setState(
{
number: this.state.number - 1
},
() => {
if (this.state.number <= 0) {
clearInterval(timer);
props.onOver && props.onOver();
}
}
);
|
最佳实践:
- 把所有的setState当作是异步的
- 永远不要信任setState调用之后的状态
- 如果要使用改变之后的状态,需要使用回调函数(setState的第二个参数)
- 如果新的状态要根据之前的状态进行运算,使用函数的方式改变状态(setState的第一个函数)
React18前,React会对异步的setState进行优化,将多次setState进行合并(将多次状态改变完成后,再统一对state进行改变,然后触发render)
React18后,默认为异步的,所以,如果一个倒计时方法内,一秒内多次使用setState使数字-1,实际上不管有多少次使用,只有一次-1,然后触发render,这是就需要使用以下方法实现:
1
2
3
4
5
6
7
8
9
10
11
12
13
14
15
16
17
18
19
20
21
22
23
24
25
26
27
28
29
| const timer = setInterval(() => {
if (this.state.number === 0) {
clearInterval(timer);
props.onOver && props.onOver();
return;
}
this.setState(
(cur) => {
return {
number: cur.number - 1
};
}
);
this.setState(
(cur) => {
return {
number: cur.number - 1
};
}
);
this.setState(
(cur) => {
return {
number: cur.number - 1
};
}
);
}, 1000);
|
这样同步调用多次就能实现-3了
生命周期
生命周期:组件从诞生到销毁会经历一系列的过程,该过程就叫做生命周期。React在组件的生命周期中提供了一系列的钩子函数(类似于事件),可以让开发者在函数中注入代码,这些代码会在适当的时候运行。
生命周期仅存在于类组件中,函数组件每次调用都是重新运行函数,旧的组件即刻被销毁
函数组件使用HOOK另说
旧版生命周期
React < 16.0.0
示例代码:
1
2
3
4
5
6
7
8
9
10
11
12
13
14
15
16
17
18
19
20
21
22
23
24
25
26
27
28
29
30
31
32
33
34
35
36
37
38
39
40
41
42
43
44
45
46
47
48
49
50
51
52
53
54
55
56
57
58
59
60
61
62
63
64
65
66
67
68
69
70
71
72
73
74
75
76
77
78
79
80
81
82
83
84
85
86
87
88
89
90
91
92
93
94
95
96
97
98
99
100
101
102
103
104
105
106
107
108
109
110
111
112
113
114
115
|
import React, { Component } from 'react';
import OldLife from './OldLife';
export default class App extends Component {
constructor(props) {
super(props);
this.state = {
number: parseInt(Math.random() * 10 + 1),
isShowComp: true
};
}
doNumIncrease = () => {
this.setState(
(cur) => {
return this.state.number === 11
? { number: 11 }
: { number: cur.number + 1 };
},
() => {
console.log('---------');
}
);
};
render() {
const OldDom = this.state.isShowComp ? (
<OldLife number={this.state.number}></OldLife>
) : null;
return (
<>
{OldDom}
<button onClick={this.doNumIncrease}>增加number</button>
<button
onClick={() => {
this.setState(
(cur) => {
return {
isShowComp: !cur.isShowComp
};
},
() => {
console.log('---------');
}
);
}}
>
组件显示隐藏
</button>
</>
);
}
}
import React, { Component } from 'react';
export default class OldLife extends Component {
constructor(props) {
super(props);
this.state = {
number: 0
};
console.log('constructor-新组件OldLife诞生');
}
componentDidMount() {
console.log('componentDidMount-虚拟DOM已被挂载到页面,成为真实DOM');
}
shouldComponentUpdate(nextProps, nextState) {
console.log('shouldComponentUpdate-nextProps', nextProps);
console.log('shouldComponentUpdate-nextState', nextState);
if (
this.props.number === nextProps.number &&
this.state.number === nextState.number
) {
return false;
}
return true;
}
componentDidUpdate(prevProps, prevState) {
console.log('componentDidUpdate-prevProps', prevProps);
console.log('componentDidUpdate-prevState', prevState);
}
componentWillUnmount() {
console.log('componentWillUnmount-组件被销毁');
}
render() {
console.log('render,渲染,返回的React元素会被挂载到虚拟DOM树中');
return (
<>
<div>传入的props.number:{this.props.number}</div>
<div>自身的state.number:{this.state.number}</div>
</>
);
}
}
|
constructor
- 同一个组件对象只会创建一次
- 不能在第一次挂载到页面之前,调用setState,为了避免问题,构造函数中严禁使用setState
componentWillMount(React 16.9.0后没有了)
- 正常情况下,和构造函数一样,它只会运行一次
- 可以使用setState,但是为了避免bug,不允许使用,因为在某些特殊情况下,该函数可能被调用多次
render
- 返回一个虚拟DOM,会被挂载到虚拟DOM树中,最终渲染到页面的真实DOM中
- render可能不只运行一次,只要需要重新渲染,就会重新运行
- 严禁使用setState,因为可能会导致无限递归渲染
componentDidMount
- 只会执行一次
- 可以使用setState
- 通常情况下,会将网络请求、启动计时器等一开始需要的操作,书写到该函数中
组件进入活跃状态
componentWillReceiveProps(React 16.9.0后没有了)
- 即将接收新的属性值
- 参数为新的属性对象
- 该函数可能会导致一些bug,所以不推荐使用
shouldComponentUpdate(是个性能优化点)
- 指示React是否要重新渲染该组件,通过返回true和false来指定
- 默认情况下,会直接返回true
所以不管属性变化、状态变化都会重新渲染
componentWillUpdate(React 16.9.0后没有了)
- 组件即将被重新渲染
componentDidUpdate
- 往往在该函数中使用dom操作,改变元素
componentWillUnmount
组件在DOM树中被销毁
- 通常在该函数中销毁一些组件依赖的资源,比如计时器
新版生命周期
React >= 16.0.0
React官方认为,某个数据的来源必须是单一的,例如,一个属性不能即受props影响也受自身state影响
- getDerivedStateFromProps
- 通过参数可以获取新的属性和状态
- 该函数是静态的,不能使用this.setState
- 该函数的返回值会覆盖掉组件状态
- 该函数几乎是没有什么用
- getSnapshotBeforeUpdate
- 真实的DOM构建完成,但还未实际渲染到页面中。
- 在该函数中,通常用于实现一些附加的dom操作
- 该函数的返回值,会作为componentDidUpdate的第三个参数
1
2
3
4
5
6
7
8
9
10
11
12
13
14
15
16
17
18
19
20
21
22
23
24
25
26
27
28
29
30
31
32
33
34
35
36
37
38
39
40
41
42
43
44
45
46
47
48
49
50
51
52
53
54
55
56
57
58
59
60
61
62
63
64
65
66
67
68
69
70
71
72
73
74
75
76
77
78
79
80
81
82
83
84
85
86
87
88
89
90
91
92
93
94
95
96
97
98
99
100
101
102
103
104
105
106
107
108
109
110
111
112
113
114
115
116
117
118
119
120
121
122
123
124
125
126
127
128
129
130
131
132
133
134
135
136
137
138
139
140
141
142
143
144
145
146
147
|
import React, { Component } from 'react';
import OldLife from './OldLife';
import NewLife from './NewLife';
export default class App extends Component {
constructor(props) {
super(props);
this.state = {
number: parseInt(Math.random() * 10 + 1),
isShowComp: true,
isShowOld: false
};
}
doNumIncrease = () => {
this.setState(
(cur) => {
return this.state.number === 11
? { number: 11 }
: { number: cur.number + 1 };
},
() => {
console.log('---------');
}
);
};
render() {
const OldDom =
this.state.isShowComp && this.state.isShowOld ? (
<OldLife number={this.state.number}></OldLife>
) : null;
const NewDom = <NewLife number={this.state.number} />;
return (
<>
<h1>旧生命周期展示</h1>
{OldDom}
<button onClick={this.doNumIncrease}>增加number</button>
<button
onClick={() => {
this.setState(
(cur) => {
return {
isShowComp: !cur.isShowComp
};
},
() => {
console.log('---------');
}
);
}}
>
组件显示隐藏
</button>
<h1>新生命周期展示</h1>
{NewDom}
<button onClick={this.doNumIncrease}>父组件增加NewLife的number</button>
</>
);
}
}
import React, { Component } from 'react';
export default class NewLife extends Component {
constructor(props) {
super(props);
this.state = {
number: 0
};
console.log('NewLife-constructor-新组件NewLife诞生');
}
static getDerivedStateFromProps(props, state) {
console.log('NewLife-getDerivedStateFromProps');
return null;
}
componentDidMount() {
console.log('NewLife-componentDidMount-虚拟DOM已被挂载到页面,成为真实DOM');
}
shouldComponentUpdate(nextProps, nextState) {
console.log('NewLife-shouldComponentUpdate-nextProps', nextProps);
console.log('NewLife-shouldComponentUpdate-nextState', nextState);
if (
this.props.number === nextProps.number &&
this.state.number === nextState.number
) {
return false;
}
return true;
}
getSnapshotBeforeUpdate(prevProps, prevState) {
console.log(
'NewLife-getSnapshotBeforeUpdate-真实的DOM构建完成,但还未实际渲染到页面中。'
);
return 123;
}
componentDidUpdate(prevProps, prevState, snapVal) {
console.log('NewLife-componentDidUpdate-prevProps', prevProps);
console.log('NewLife-componentDidUpdate-prevState', prevState);
console.log('NewLife-componentDidUpdate-snapVal', snapVal);
}
componentWillUnmount() {
console.log('NewLife-componentWillUnmount-组件被销毁');
}
render() {
console.log('NewLife-render,渲染,返回的React元素会被挂载到虚拟DOM树中');
return (
<>
<div>传入的props.number:{this.props.number}</div>
<div>自身的state.number:{this.state.number}</div>
<button
onClick={() => {
this.setState((cur) => {
return { number: cur.number + 1 };
});
}}
>
新生命周期组件内state.number+1
</button>
</>
);
}
}
|
传递元素内容
内置组件:div、h1、p
1
2
3
| <div>
asdfafasfafasdfasdf
</div>
|
如果给自定义组件传递元素内容,则React会将元素内容作为children属性传递过去。
1
2
3
4
5
6
7
8
9
10
11
12
13
14
15
16
17
18
19
20
21
22
23
24
25
26
27
28
29
30
31
32
33
34
35
36
37
38
39
40
41
42
43
44
45
46
47
48
49
50
51
52
53
54
55
56
57
58
59
60
61
62
63
64
65
66
67
68
69
70
71
72
73
74
75
76
|
import React from 'react';
import { createRoot } from 'react-dom/client';
import Comp from './Comp';
const Dom = (
<>
<Comp
html={<h1>这是传递元素第一种写法props.html</h1>}
content={<h2>这是传递的h2元素</h2>}
container={<h3>这是传递的h3元素</h3>}
>
<h1>这是传递元素第二种写法props.children的h1元素</h1>
<h2>这是传递元素第二种写法props.children的h2元素</h2>
</Comp>
<Comp></Comp>
</>
);
const container = createRoot(document.getElementById('root'));
container.render(Dom);
import React from 'react';
export default function Comp(props) {
const DoHandleEle = () => {
const propsValAry = Object.values(props).flat();
if (propsValAry && propsValAry.length) {
const tempEleAry = propsValAry.map((item, index) => {
return <div key={item.props.children}>{item}</div>;
});
return tempEleAry;
} else {
return <h1>两种写法都没有传递数据显示的默认值</h1>;
}
};
return (
<div>
<DoHandleEle />
</div>
);
}
|
表单
受控组件和非受控组件
受控组件
组件的使用者,有能力完全控制该组件的行为和内容。通常情况下,受控组件往往没有自身的状态,其内容完全受到属性的控制。
1
2
3
4
5
6
7
8
9
10
11
12
|
import React, { Component } from 'react';
export default class App extends Component {
render() {
return (
<div>
<input type='text' value={123} />
</div>
);
}
}
|
例如上面的input组件,他的内容受value控制
非受控组件
组件的使用者,没有能力控制该组件的行为和内容,组件的行为和内容完全自行控制。
表单组件,默认情况下是非受控组件,一旦设置了表单组件的value属性,则其变为受控组件(单选和多选框需要设置checked)
1
2
3
4
5
6
7
8
9
10
11
12
|
import React, { Component } from 'react';
export default class App extends Component {
render() {
return (
<div>
<input type='text' />
</div>
);
}
}
|
简单的表单应用:
1
2
3
4
5
6
7
8
9
10
11
12
13
14
15
16
17
18
19
20
21
22
23
24
25
26
27
28
29
30
31
32
33
34
35
36
37
38
39
40
41
42
43
44
45
46
47
48
49
50
51
52
53
54
55
56
57
58
59
60
61
62
63
64
65
66
67
68
69
70
71
72
73
74
75
76
77
78
79
80
81
82
83
84
85
86
87
88
89
90
91
92
93
94
95
96
97
98
99
100
101
102
103
104
105
106
107
108
109
110
111
112
113
114
115
116
117
118
119
120
121
122
123
124
125
|
import React, { Component } from 'react';
export default class FormItem extends Component {
state = {
loginId: '',
loginPwd: '',
sex: 'male',
chooseLoves: [],
loves: [
{ value: 'football', text: '足球' },
{ value: 'basetball', text: '篮球' },
{ value: 'movie', text: '电影' },
{ value: 'music', text: '音乐' },
{ value: 'other', text: '其他' }
],
city: 'shanghai'
};
doHandleChange = (e) => {
let val = e.target.value;
const name = e.target.name;
if (e.target.type === 'checkbox') {
if (e.target.checked) {
val = [...this.state.chooseLoves, val];
} else {
val = this.state.chooseLoves.filter((item) => item !== val);
}
}
this.setState({
[name]: val
});
};
doGetLoveCheckbox = () => {
const lvBox = this.state.loves.map((item) => {
return (
<label key={item.value}>
<input
type='checkbox'
name='chooseLoves'
value={item.value}
checked={this.state.chooseLoves.includes(item.value)}
onChange={this.doHandleChange}
/>
{item.text}
</label>
);
});
return lvBox;
};
render() {
const loveBox = this.doGetLoveCheckbox();
return (
<div>
<p>
<input
type='text'
name='loginId'
value={this.state.loginId}
onChange={this.doHandleChange}
/>
</p>
<p>
<input
type='text'
name='loginPwd'
value={this.state.loginPwd}
onChange={this.doHandleChange}
/>
</p>
<p>
<label htmlFor=''>
<input
type='radio'
name='sex'
value='male'
checked={this.state.sex === 'male'}
onChange={this.doHandleChange}
/>
男
</label>
<label htmlFor=''>
<input
type='radio'
name='sex'
value='female'
checked={this.state.sex === 'female'}
onChange={this.doHandleChange}
/>
女
</label>
</p>
<p>
<select value={this.state.city} onChange={this.doHandleChange}>
<option value='beijing'>北京</option>
<option value='shanghai'>上海</option>
<option value='nanjing'>南京</option>
<option value='suzhou'>苏州</option>
</select>
</p>
<p>{loveBox}</p>
<p>
<button
onClick={() => {
console.log(this.state);
}}
>
获取表单数据
</button>
</p>
</div>
);
}
}
|
属性默认值和类型验证
属性默认值
通过一个静态属性defaultProps告知react属性默认值
1
2
3
4
5
6
7
8
9
10
11
12
13
14
15
16
17
18
19
20
21
22
23
24
25
26
27
28
29
30
31
32
33
34
35
36
37
38
39
40
41
42
43
44
45
46
47
48
49
50
51
52
53
54
55
56
57
58
59
60
61
62
63
64
65
66
67
68
69
70
71
72
73
74
|
import React, { Component } from 'react';
import FuncDefault from './FuncDefault';
import ClassDefault from './ClassDefault';
export default class App extends Component {
render() {
return (
<div>
函数组件的属性默认值:
<FuncDefault a={20} />
<hr />
类组件的属性默认值:
<ClassDefault b={21} />
</div>
);
}
}
import React, { Component } from 'react';
export default class ClassDefault extends Component {
static defaultProps = {
a: 1,
b: 2,
c: 3
};
constructor(props) {
super(props);
console.log(props);
}
render() {
return (
<div>
<p>a:{this.props.a}</p>
<p>b:{this.props.b}</p>
<p>c:{this.props.c}</p>
</div>
);
}
}
import React from 'react';
export default function FuncDefault(props) {
console.log(props);
return (
<div>
<p>a:{props.a}</p>
<p>b:{props.b}</p>
<p>c:{props.c}</p>
</div>
);
}
FuncDefault.defaultProps = {
a: 1,
b: 2,
c: 3
};
|
属性类型检查
使用库:prop-types
对组件使用静态属性propTypes告知react如何检查属性
1
2
3
4
5
6
7
8
9
10
11
12
13
14
15
16
17
18
19
20
21
22
23
24
| PropTypes.any://任意类型
PropTypes.array://数组类型
PropTypes.bool://布尔类型
PropTypes.func://函数类型
PropTypes.number://数字类型
PropTypes.object://对象类型
PropTypes.string://字符串类型
PropTypes.symbol://符号类型
PropTypes.node://任何可以被渲染的内容,字符串、数字、React元素
PropTypes.element://react元素
PropTypes.elementType://react元素类型
PropTypes.instanceOf(构造函数)://必须是指定构造函数的实例
PropTypes.oneOf([xxx, xxx])://枚举
PropTypes.oneOfType([xxx, xxx]); //属性类型必须是数组中的其中一个
PropTypes.arrayOf(PropTypes.XXX)://必须是某一类型组成的数组
PropTypes.objectOf(PropTypes.XXX)://对象由某一类型的值组成
PropTypes.shape(对象): //属性必须是对象,并且满足指定的对象要求
PropTypes.exact({...})://对象必须精确匹配传递的数据
//自定义属性检查,如果有错误,返回错误对象即可
属性: function(props, propName, componentName) {
//...
}
|
1
2
3
4
5
6
7
8
9
10
11
12
13
14
15
16
17
18
19
20
21
22
23
24
25
26
27
28
29
30
31
32
33
34
35
36
37
38
39
40
41
42
43
44
45
46
47
48
49
50
51
52
53
54
55
56
57
58
59
60
61
62
63
64
65
66
67
68
69
70
71
72
73
74
75
76
77
78
79
80
81
82
83
84
85
86
87
88
89
90
91
92
93
94
95
96
97
98
99
100
101
102
103
104
105
106
107
108
109
110
111
112
113
114
115
116
|
import React, { Component } from 'react';
import FuncDefault from './FuncDefault';
import ClassDefault from './ClassDefault';
import ValidationComp, { A } from './ValidationComp';
export default class App extends Component {
render() {
return (
<div>
函数组件的属性默认值:
<FuncDefault a={20} />
<hr />
类组件的属性默认值:
<ClassDefault b={21} />
<hr />
类型检查:
<ValidationComp
a={2}
b={false}
c={99}
d={<input type='text' />}
e={ClassDefault}
f={new A()}
g={'男'}
h={[2]}
i={{
name: 'yy',
age: 25,
address: {
province: '12'
}
}}
j={1}
/>
</div>
);
}
}
import React from 'react';
import PropTypes from 'prop-types';
export default function ValidationComp(props) {
const E = props.e;
return (
<div>
<p>a:{props.a}</p>
<p>b:{props.b.toString()}</p>
<p>c:{props.c}</p>
<p>d:{props.d}</p>
<div>
e:
<E />
</div>
<p>g:{props.g}</p>
<p>h:{props.h}</p>
<p>i:{JSON.stringify(props.i)}</p>
<p>j:{props.j}</p>
</div>
);
}
export function A() {
return 1;
}
ValidationComp.defaultProps = {
a: 0,
b: true,
c: 0
};
ValidationComp.propTypes = {
a: PropTypes.number.isRequired,
b: PropTypes.bool.isRequired,
c: PropTypes.number.isRequired,
d: PropTypes.element.isRequired,
e: PropTypes.elementType.isRequired,
f: PropTypes.instanceOf(A).isRequired,
g: PropTypes.oneOf(['男', '女']).isRequired,
h: PropTypes.arrayOf(PropTypes.number).isRequired,
i: PropTypes.shape({
name: PropTypes.string,
age: PropTypes.number,
address: PropTypes.shape({
province: PropTypes.string
})
}).isRequired,
j: function (props, propName, componentName) {
console.log('props', props);
console.log('propName', propName);
console.log('componentName', componentName);
const val = props[propName];
if (val === null || val === undefined) {
return new Error(
`invalid prop ${propName} in ${componentName}, ${propName} is required!`
);
}
if (typeof val !== 'number') {
return new Error(
`invalid prop ${propName} in ${componentName}, ${propName} is NaN!`
);
}
}
};
|
HOC 高阶组件
HOF:Higher-Order Function, 高阶函数,以函数作为参数,并返回一个函数
HOC: Higher-Order Component, 高阶组件,以组件作为参数,并返回一个组件
通常,可以利用HOC实现横切关注点。
举例:20个组件,每个组件在创建组件和销毁组件时,需要作日志记录
20个组件,它们需要显示一些内容,得到的数据结构完全一致
注意
- 不要在render中使用高阶组件
- 不要在高阶组件内部更改传入的组件
示例
记录日志的高阶组件withLog
1
2
3
4
5
6
7
8
9
10
11
12
13
14
15
16
17
18
19
20
21
22
23
24
25
26
|
import React, { Component } from 'react';
export default function withLog(Comp, str) {
return class LogWrapper extends Component {
componentDidMount() {
console.log(`日志:组件${Comp.name}被创建了! ${Date.now()}`);
}
componentWillUnmount() {
console.log(`日志:组件${Comp.name}被销毁了! ${Date.now()}`);
}
render() {
return (
<>
<p>{str}</p>
<Comp {...this.props} />
</>
);
}
};
}
|
控制组件显示隐藏的高阶组件
1
2
3
4
5
6
7
8
9
10
11
12
13
14
15
16
|
import React from 'react';
export default function withLogin(Comp) {
return function LoginWrapper(props) {
if (props.isLogin) {
return <Comp {...props} />;
} else {
return null;
}
};
}
|
加一个下划线的高阶组件
1
2
3
4
5
6
7
8
9
10
11
12
13
14
15
16
|
import React from 'react';
export default function withHr(Comp) {
return function HrWrapper(props) {
return (
<div>
<Comp {...props} />
<hr />
</div>
);
};
}
|
使用高阶组件包裹
1
2
3
4
5
6
7
8
9
10
11
12
13
14
15
16
17
18
19
20
21
22
23
24
25
26
27
28
29
30
31
32
33
34
35
36
37
38
39
40
41
|
import React from 'react';
import { A, B } from './Comps';
import withLog from './HOC/withLog';
import withLogin from './HOC/withLogin';
import withHr from './HOC/withHr';
const AComp = withHr(withLogin(withLog(A, '123123')));
const BComp = withHr(withLogin(withLog(B, '哦哦哦哦')));
export default function App() {
return (
<div>
<AComp isLogin a={123} />
<BComp isLogin b={999} />
</div>
);
}
import React, { Component } from 'react';
export class A extends Component {
render() {
return (
<div>
A<p>a:{this.props.a}</p>
</div>
);
}
}
export class B extends Component {
render() {
return (
<div>
B<p>b:{this.props.b}</p>
</div>
);
}
}
|
ref
reference: 引用,不要滥用,ref直接操作组件对象或真实DOM的理念是不符合React理念的
希望直接使用dom元素中的某个方法,或者希望直接使用自定义组件中的某个方法
类组件使用ref
- ref作用于内置的html组件,得到的将是真实的dom对象
- ref作用于类组件,得到的将是类的实例
- ref不能作用于函数组件
字符串赋值的方式被移出
ref推荐使用对象或者是函数
对象
通过 React.createRef 函数创建
1
2
3
4
5
6
7
8
9
10
11
12
13
14
15
16
17
18
19
20
21
22
23
24
25
| import React, { Component } from 'react';
export default class Comp extends Component {
constructor(props) {
super(props);
this.myInputRef = {
current: null
};
}
doHandleClick = () => {
this.myInputRef.current.focus();
};
render() {
return (
<div>
<input ref={this.myInputRef} type='text' />
<button onClick={this.doHandleClick}>聚焦</button>
</div>
);
}
}
|
函数
1
2
3
4
5
6
7
8
9
10
11
12
13
14
15
16
17
18
19
20
21
| import React, { Component } from 'react';
export default class Comp extends Component {
doHandleClick = () => {
this.myInputRef.focus();
};
render() {
return (
<div>
<input
ref={(el) => {
this.myInputRef = el;
}}
type='text'
/>
<button onClick={this.doHandleClick}>聚焦</button>
</div>
);
}
}
|
函数就是ref中的
1
2
3
| (el) => {
this.myInputRef = el;
}
|
函数的调用时间:
componentDidMount的时候会调用该函数
- 在componentDidMount事件中可以使用ref
如果ref的值发生了变动(旧的函数被新的函数替代),分别调用旧的函数以及新的函数,时间点出现在componentDidUpdate之前
- 旧的函数被调用时,传递null
- 新的函数被调用时,传递对象
1
2
3
4
5
6
7
8
9
10
11
12
13
14
15
16
17
18
19
20
21
22
| import React, { Component } from 'react';
export default class Comp extends Component {
doHandleClick = () => {
this.myInputRef.focus();
this.setState({});
};
getInputRef = (el) => {
console.log('函数被调用了');
this.myInputRef = el;
};
render() {
return (
<div>
<input ref={this.getInputRef} type='text' />
<button onClick={this.doHandleClick}>聚焦</button>
</div>
);
}
}
|
如果提出来写,则不会多次调用函数里面的内容
如果ref所在的组件被卸载,会调用函数,el是null
1
2
3
4
5
6
7
8
9
10
11
12
13
14
15
16
17
18
19
20
21
22
23
24
25
26
27
28
29
30
31
32
33
34
35
| import React, { Component } from 'react';
export default class Comp extends Component {
state = {
isShow: true
};
doHandleClick = () => {
this.myInputRef.focus();
this.setState({});
};
getInputRef = (el) => {
console.log('函数被调用了', el);
this.myInputRef = el;
};
doChangeShow = () => {
this.setState((cur) => {
return {
isShow: !cur.isShow
};
});
};
render() {
return (
<div>
{this.state.isShow && <input ref={this.getInputRef} type='text' />}
<button onClick={this.doHandleClick}>聚焦</button>
<button onClick={this.doChangeShow}>显示/隐藏</button>
</div>
);
}
}
|
谨慎使用ref
能够使用属性和状态进行控制,就不要使用ref。
- 调用真实的DOM对象中的方法
- 某个时候需要调用类组件的方法
函数组件使用ref
1
2
3
4
5
6
7
8
9
10
11
12
13
14
15
16
| import React, { useRef } from 'react';
export default function Comp() {
const doHandleClick = () => {
myInputRef.current.focus();
};
const myInputRef = useRef(null);
return (
<div>
<input ref={myInputRef} type='text' />
<button onClick={doHandleClick}>聚焦</button>
</div>
);
}
|
ref转发(forwardRef)
forwardRef可以用在高阶组件的ref层层转发,使组件最外层使用者可以通过最外层的ref获取到最底层的元素,如果不转发,最外层的ref只能获取到下一层的高阶组件的元素
forwardRef方法:
- 参数,传递的是函数组件,不能是类组件,并且,函数组件需要有第二个参数来得到ref(如:
function A(props, ref))
- 返回值,返回一个新的组件:
const NewA = React.forwardRef(A)
1
2
3
4
5
6
7
8
9
10
11
12
13
14
15
16
17
18
19
20
21
22
23
24
25
26
27
28
29
30
31
32
33
|
import React, { Component } from 'react';
const NewA = React.forwardRef(A);
function A(props, ref) {
return (
<>
<h1 ref={ref}>这是A函数组件里的h1元素</h1>
<p>{props.text}</p>
</>
);
}
export default class Comp extends Component {
ARef = React.createRef();
componentDidMount() {
console.log('componentDidMount', this.ARef);
}
render() {
return (
<>
<div>
<NewA ref={this.ARef} text={'yayaya'} />
</div>
</>
);
}
}
|
1
2
3
4
5
6
7
8
9
10
11
12
13
14
15
16
17
18
19
20
21
22
23
24
25
26
27
28
29
30
31
32
33
34
35
36
|
export default class Comp extends Component {
BRef = React.createRef();
componentDidMount() {
console.log('componentDidMount-BRef', this.BRef);
}
render() {
return (
<>
<div>
<NewB ref={this.BRef} name={'aiaiai'} />
</div>
</>
);
}
}
const NewB = React.forwardRef(function trans(props, ref) {
return <B {...props} abc={ref} />;
});
class B extends Component {
render() {
return (
<>
<div ref={this.props.abc}>
组件B
<p>{this.props.name}</p>
</div>
</>
);
}
}
|
通过这种ref转发方法,在外层组件就能通过ref获取到函数组件内的元素
高阶组件配合forwardRef转发ref的使用
首先在最外层调用的地方创建一个ref:const ACompRef = React.createRef();
1
2
3
4
5
6
7
8
9
10
11
12
13
14
15
16
17
18
19
20
21
22
23
24
25
26
27
28
29
30
31
32
33
34
35
36
37
38
39
40
41
42
|
import React from 'react';
import { A } from './Comps';
import withLog from './HOC/withLog';
import withLogin from './HOC/withLogin';
import withHr from './HOC/withHr';
const AComp = withHr(withLogin(withLog(A, '123123')));
export default function App() {
const ACompRef = React.createRef();
const doGetACompEle = () => {
console.log('-----App---->', ACompRef.current);
};
return (
<div>
<AComp ref={ACompRef} isLogin a={123} />
<button onClick={doGetACompEle}>点击获取AComp的元素</button>
</div>
);
}
|
因为上面的根组件是被多个高阶组件层层包裹(const AComp = withHr(withLogin(withLog(A, '123123')));),所以需要对高阶组件里面进行处理,对ref进行转发
1
2
3
4
5
6
7
8
9
10
11
12
13
14
15
16
17
18
19
20
21
22
23
24
25
26
27
28
29
30
31
32
33
|
import React, { Component } from 'react';
export default function withLog(Comp, str) {
class LogWrapper extends Component {
componentDidMount() {
console.log(`日志:组件${Comp.name}被创建了! ${Date.now()}`);
}
componentWillUnmount() {
console.log(`日志:组件${Comp.name}被销毁了! ${Date.now()}`);
}
render() {
const { forwardRef, ...rest } = this.props;
return (
<>
<p>{str}</p>
<Comp {...rest} ref={forwardRef} />
</>
);
}
}
const NewLogWrapper = React.forwardRef(function transformRef(props, ref) {
return <LogWrapper {...props} forwardRef={ref} />;
});
return NewLogWrapper;
}
|
1
2
3
4
5
6
7
8
9
10
11
12
13
14
15
16
17
18
19
20
|
import React from 'react';
export default function withLogin(Comp) {
function LoginWrapper(props, ref) {
if (props.isLogin) {
return <Comp {...props} ref={ref} />;
} else {
return null;
}
}
const NewLoginWrapper = React.forwardRef(LoginWrapper);
return NewLoginWrapper;
}
|
1
2
3
4
5
6
7
8
9
10
11
12
13
14
15
16
17
18
19
20
|
import React from 'react';
export default function withHr(Comp) {
function HrWrapper(props, ref) {
return (
<div>
<Comp {...props} ref={ref} />
<hr />
</div>
);
}
const NewHrWrapper = React.forwardRef(HrWrapper);
return NewHrWrapper;
}
|
上面是分别是对函数组件和类组件不同写法的处理
到这里,在App.jsx里的ACompRef已经可以获取到层层转发到根组件的A;(ACompRef: {current: A})
此时的根组件是如下的:
1
2
3
4
5
6
7
8
9
10
11
12
13
|
import React, { Component } from 'react';
export class A extends Component {
render() {
return (
<div>
<input type='text' />A<p>a:{this.props.a}</p>
</div>
);
}
}
|
如果期望还能获取到A组件里面的元素,并对根组件内部的元素进行操作,那么在根组件内还需要进行ref的挂载,如下:
1
2
3
4
5
6
7
8
9
10
11
12
13
14
15
16
17
|
import React, { Component } from 'react';
class OriginA extends Component {
render() {
return (
<div ref={this.props.forwardRef}>
<input type='text' />A<p>a:{this.props.a}</p>
</div>
);
}
}
const NewA = React.forwardRef(function transformARef(props, ref) {
return <OriginA {...props} forwardRef={ref} />;
})
export { NewA as A };
|
这样的话在最外层组件(App.jsx),可以操作ACompRef.current获取到div及其子元素,并对其进行操作,如ACompRef.current.firstChild.focus()点击后输入框实现聚焦等操作。
详细操作,如需回忆,代码在github的“forwardRef在高阶组件上的应用”分支上
Context上下文
上下文:Context,表示做某一些事情的环境
React中的上下文特点:
- 当某个组件创建了上下文后,上下文中的数据,会被所有后代组件共享
- 如果某个组件依赖了上下文,会导致该组件不再纯粹(外部数据仅来源于属性props)
- 一般情况下,用于第三方组件(通用组件)
旧的API(React16前 )
创建上下文
只有类组件才可以创建上下文
- 给类组件书写静态属性 childContextTypes,使用该属性对上下文中的数据类型进行约束
- 添加实例方法 getChildContext,该方法返回的对象,即为上下文中的数据,该数据必须满足类型约束,该方法会在每次render之后运行。
1
2
3
4
5
6
7
8
9
10
11
12
13
14
15
16
17
18
19
20
21
22
23
24
25
26
27
| import React, { Component } from 'react';
import PropTypes from 'prop-types';
export default class OldContext extends Component {
static childContextTypes = {
a: PropTypes.number,
b: PropTypes.string.isRequired
};
getChildContext() {
console.log('获取上下文中的数据');
return {
a: 123,
b: 'mikasa'
};
}
render() {
return <div></div>;
}
}
|
使用上下文中的数据
要求:如果要使用上下文中的数据,组件必须有一个静态属性 contextTypes,该属性描述了需要获取的上下文中的数据类型
- 可以在组件的构造函数中,通过第二个参数,获取上下文数据
- 从组件的context属性中获取(18已经弃用)
- 在函数组件中,通过第二个参数,获取上下文数据
1
2
3
4
5
6
7
8
9
10
11
12
13
14
15
16
17
18
19
20
21
22
23
24
25
26
27
28
29
30
31
32
33
34
35
36
37
38
39
40
41
42
43
44
45
46
47
48
49
50
51
52
53
54
55
56
57
58
59
60
61
62
63
64
65
66
67
68
69
70
71
72
73
74
75
76
77
78
79
80
81
82
83
| import React, { Component } from 'react';
import PropTypes from 'prop-types';
const types = {
a: PropTypes.number,
b: PropTypes.string.isRequired
};
function ChildA(props, context) {
return (
<>
<div>
ChildA
<h2>a:{context.a}</h2>
<h2>b:{context.b}</h2>
<h2>c:{context.c}</h2>
<ChildB />
</div>
</>
);
}
ChildA.contextTypes = { ...types, c: PropTypes.string.isRequired };
class ChildB extends Component {
constructor(props, context) {
super(props);
console.log('context', context);
}
static contextTypes = types;
render() {
return (
<>
<hr />
<div>
ChildB
<p>上下文的a:{this.context.a}</p>
<p>上下文的b:{this.context.b}</p>
</div>
<hr />
</>
);
}
}
export default class OldContext extends Component {
static childContextTypes = {
a: PropTypes.number,
b: PropTypes.string.isRequired,
c: PropTypes.string.isRequired
};
getChildContext() {
return {
a: 123,
b: 'mikasa',
c: 'yaeger'
};
}
render() {
return (
<div>
<ChildA />
</div>
);
}
}
|
上下文的数据变化
上下文中的数据不可以直接变化,最终都是通过状态改变
在上下文中加入一个处理函数,可以用于后代组件更改上下文的数据
1
2
3
4
5
6
7
8
9
10
11
12
13
14
15
16
17
18
19
20
21
22
23
24
25
26
27
28
29
30
31
32
33
34
35
36
37
38
39
40
41
42
43
44
45
46
47
48
49
50
51
52
53
54
55
56
57
58
59
60
61
62
63
64
65
66
67
68
69
70
71
72
73
74
75
76
77
78
79
80
81
82
83
84
85
86
87
88
89
90
91
92
93
94
95
96
97
98
99
100
101
102
103
104
105
106
107
108
109
110
111
112
113
114
115
116
117
118
119
120
121
122
123
| import React, { Component } from 'react';
import PropTypes from 'prop-types';
const types = {
a: PropTypes.number,
b: PropTypes.string.isRequired,
changeFunc: PropTypes.func.isRequired
};
function ChildA(props, context) {
return (
<>
<div>
ChildA
<h2>a:{context.a}</h2>
<h2>b:{context.b}</h2>
<h2>c:{context.c}</h2>
<ChildB />
</div>
</>
);
}
ChildA.contextTypes = { ...types, c: PropTypes.string.isRequired };
class ChildB extends Component {
constructor(props, context) {
super(props);
console.log('context', context);
}
static contextTypes = types;
render() {
return (
<>
<hr />
<div>
ChildB
<p>上下文的a:{this.context.a}</p>
<p>上下文的b:{this.context.b}</p>
<button
onClick={() => {
this.context.changeFunc(this.context.a - 2);
}}
>
a-2
</button>
</div>
<hr />
</>
);
}
}
export default class OldContext extends Component {
static childContextTypes = {
a: PropTypes.number,
b: PropTypes.string.isRequired,
c: PropTypes.string.isRequired,
changeFunc: PropTypes.func.isRequired
};
state = {
a: 122,
b: 'mikasa',
c: 'yaeger'
};
getChildContext() {
console.log('属性或者状态变化,重新获取新的上下文数据');
return {
a: this.state.a,
b: this.state.b,
c: this.state.c,
changeFunc: this.doSolveA
};
}
doSolveA = (numebr) => {
this.setState((cur) => {
return {
a: numebr
};
});
};
doHandleClick = () => {
this.setState((cur) => {
return {
a: cur.a + 1
};
});
};
render() {
return (
<div>
<ChildA />
<button onClick={this.doHandleClick}>a+1</button>
</div>
);
}
}
|
新版API
旧版API存在严重的效率问题,并且容易导致滥用
创建上下文
上下文是一个独立于组件的对象,该对象通过React.createContext(默认值)创建
返回的是一个包含两个属性的对象
- Provider属性:生产者。一个组件,该组件会创建一个上下文,该组件有一个value属性,通过该属性,可以为其数据赋值
- 同一个Provider,不要用到多个组件中,如果需要在其他组件中使用该数据,应该考虑将数据提升到更高的层次
- Consumer属性
使用上下文中的数据
在类组件中,直接使用this.context获取上下文数据
- 要求:必须拥有静态属性
contextType , 应赋值为创建的上下文对象
1
2
3
4
5
6
7
8
9
10
11
12
13
14
15
16
17
18
19
20
21
22
23
24
| class ChildB extends Component {
static contextType = ctx;
render() {
return (
<>
<hr />
<div>
ChildB
<p>上下文的name:{this.context.name}</p>
<p>上下文的age:{this.context.age}</p>
<button
onClick={() => {
this.context.changeFunc(this.context.a - 2);
}}
>
a-2
</button>
</div>
<hr />
</>
);
}
}
|
在函数组件中,需要使用Consumer来获取上下文数据
- Consumer是一个组件
- 它的子节点,是一个函数(它的props.children需要传递一个函数)
1
2
3
4
5
6
7
8
9
10
11
12
13
14
15
16
17
18
19
20
21
22
23
24
25
26
27
28
29
30
31
32
33
34
35
36
37
38
39
40
41
42
43
44
45
46
47
48
49
50
51
52
53
54
55
56
57
58
59
60
61
62
63
64
65
66
67
68
69
70
71
72
73
74
75
76
77
78
79
80
81
82
83
84
85
86
87
88
89
90
91
92
93
94
95
96
97
98
99
100
101
| import React, { Component } from 'react';
const ctx = React.createContext();
const ctx2 = React.createContext();
function ChildA(props, context) {
return (
<>
<ctx2.Provider value={{ newWorld: 'outer', countryNum: 99 }}>
<div>
ChildA
<div>
<ctx.Consumer>
{(value) => (
<>
<h2>name:{value.name}</h2>
<h2>age:{value.age}</h2>
<button
onClick={() => {
value.changeAge(value.age * 2);
}}
>
后代组件按钮age*2
</button>
</>
)}
</ctx.Consumer>
</div>
<ChildB />
</div>
</ctx2.Provider>
</>
);
}
class ChildB extends Component {
static contextType = ctx;
render() {
return (
<>
<ctx2.Consumer>
{(value) => (
<>
<hr />
<div>
ChildB
<p>上下文的name:{this.context.name}</p>
<p>上下文的age:{this.context.age}</p>
<button
onClick={() => {
this.context.changeAge(this.context.age - 2);
}}
>
后代组件按钮age-2
</button>
</div>
<hr />
<div>ChildA-NewWorld:{value.newWorld}</div>
<div>ChildA-countryNum:{value.countryNum}</div>
</>
)}
</ctx2.Consumer>
</>
);
}
}
export default class NewContext extends Component {
state = {
name: 'yaeger',
age: 19,
changeAge: (numebr) => {
this.setState((cur) => {
return {
age: numebr
};
});
}
};
doHandleClick = () => {
this.setState((cur) => {
return {
age: cur.age + 1
};
});
};
render() {
return (
<ctx.Provider value={this.state}>
<ChildA />
<button onClick={this.doHandleClick}>父组件按钮age+1</button>
</ctx.Provider>
);
}
}
|
注意细节
如果,上下文提供者(Context.Provider)中的value属性发生变化(Object.is比较),会导致该上下文提供的所有后代元素全部重新渲染,无论该子元素是否有优化(无论shouldComponentUpdate函数返回什么结果)
PureComponent
纯组件,避免不必要渲染(render函数的运行),从而提高效率
比如,有一个任务列表,里面有十条任务,点击按钮添加一条新的任务,点击按钮添加新的任务时,整体页面关联的组件都会重新渲染,其实只需要渲染新添加的就可以了
优化:如果一个组件的属性和状态都没有发生变化,就不进行重新渲染
比如可以在shouldComponentUpdate生命周期函数中,对属性和状态做判断来决定是否重新渲染
1
2
3
4
5
6
7
8
9
10
11
12
13
14
15
16
17
|
function ObjEqual(obj1, obj2) {
for (const prop in obj1) {
if (!Object.is(obj1[prop], obj2[prop])) {
return false;
}
}
return true;
}
shouldComponentUpdate(nextProps, nextState) {
if (ObjEqual(this.props, nextProps) && ObjEqual(this.state, nextState)) {
return false;
}
return true;
}
|
除此之外,可以使用PureComponent
PureComponent是一个组件,如果某个组件继承自该组件,则该组件的shouldComponentUpdate会进行优化,对属性和状态进行浅比较,如果相等则不会重新渲染。
使用PureComponent注意
1、PureComponent只是进行的是浅比较,可能出现改动之前的数组,并没有发生重新渲染,因为,改动之前的数组,他的地址没有发生变化,浅比较无法识别,比如使用ary.push({…}),这种可能就无法识别变化,可以改为使用ary.concat({…}),或者创建一个新的数组
1-1、为了效率,应该尽量使用PrueComponent
1-2、要求不要改动之前的状态,永远是创建新的状态覆盖之前的状态
1-3、有一个第三方JS库,Immutable.js,它专门用于制作不可变对象
2、函数组件使用React.memo创建函数
1
2
3
4
5
6
7
8
9
10
11
12
13
14
|
function Task(props) {
console.log('Task Render - lv3');
return (
<div>
<li className={props.isFinish ? 'finish' : ''}>{props.name}</li>
</div>
);
}
Task.propTypes = {
name: PropTypes.string.isRequired,
isFinish: PropTypes.bool.isRequired
};
export default React.memo(Task);
|
render props
有时候,某些组件的各种功能及其处理逻辑几乎完全相同,只是显示的界面不一样,建议下面的方式认选其一来解决重复代码的问题(横切关注点)
- render props
- 某个组件,需要某个属性
- 该属性是一个函数,函数的返回值用于渲染
- 函数的参数会传递为需要的数据
- 注意纯组件的属性(尽量避免每次传递的render props的地址不一致)
- 通常该属性的名字叫做render
- HOC高阶组件
Portals
插槽:将一个React元素渲染到指定的DOM容器中
ReactDOM.createPortal(React元素, 真实的DOM容器),该函数返回一个React元素
注意事件冒泡
- React中的事件是包装过的
- 它的事件冒泡是根据虚拟DOM树来冒泡的,与真实的DOM树无关。
- 通过浏览器ReactDevTool调试可以看到虚拟DOM仍然还是呈树结构,尽管在控制台Elements中看真实DOM可能在不同树结构上了,但是事件冒泡仍然还是根据虚拟DOM的结构。
示例
1
2
3
4
5
6
7
8
9
10
11
12
13
14
15
16
17
18
19
20
21
22
23
24
25
26
27
28
29
30
|
import React from 'react';
import ReactDOM from 'react-dom';
function ChildA() {
return ReactDOM.createPortal(
<div className='child-a' style={{ 'margin-top': '200px' }}>
<h1>ChildA </h1>
<ChildB />
</div>,
document.querySelector('.modal')
);
}
function ChildB() {
return (
<div className='child-b'>
<h1>ChildB </h1>
</div>
);
}
export default function App() {
return (
<div className='app'>
<h1>App</h1>
<ChildA />
</div>
);
}
|
使用ReactDOM.createPortal将ChildA插到.modal元素下,真实DOM和虚拟DOM结构不同,呈现如下:
1
2
3
4
5
6
7
8
9
10
11
12
13
14
15
16
17
18
19
20
21
22
23
24
25
26
27
|
<div id="root">
<div class="app">
<h1>App</h1>
</div>
</div>
<div class="modal">
<div class="child-a" style="margin-top: 200px;">
<h1>ChildA </h1>
<div class="child-b">
<h1>ChildB </h1>
</div>
</div>
</div>
<div id="root">
<div class="app">
<h1>App</h1>
<div class="child-a" style="margin-top: 200px;">
<h1>ChildA </h1>
<div class="child-b">
<h1>ChildB </h1>
</div>
</div>
</div>
</div>
|
错误边界
默认情况下,若一个组件在渲染期间(render)发生错误,会导致整个组件树全部被卸载
错误边界:是一个组件,该组件会捕获到渲染期间(render)子组件发生的错误,并有能力阻止错误继续传播
让某个组件捕获错误
编写生命周期函数 getDerivedStateFromError
- 静态函数
- 运行时间点:渲染子组件的过程中,发生错误之后,在更新页面之前
- 注意:只有子组件发生错误,才会运行该函数,自身组件发生错误不会执行这个函数
- 该函数返回一个对象,React会将该对象的属性覆盖掉当前组件的state
- 参数:错误对象
- 通常,该函数用于改变状态
1
2
3
4
5
6
7
8
9
10
11
12
13
14
15
16
17
18
19
20
21
22
23
24
25
26
27
|
import React, { PureComponent } from 'react';
export default class ErrorBound extends PureComponent {
state = {
hasError: false
};
static getDerivedStateFromError(error) {
console.log('发生错误了', error);
return {
hasError: true
};
}
render() {
if (this.state.hasError) {
return <h1>发生错误了!</h1>;
}
return this.props.children;
}
}
|
编写生命周期函数 componentDidCatch
- 实例方法
- 运行时间点:渲染子组件的过程中,发生错误,更新页面之后,由于其运行时间点比较靠后,因此不太会在该函数中改变状态
- 通常,该函数用于记录错误消息
1
2
3
4
5
6
7
8
9
| componentDidCatch(error, info) {
console.log('error', error);
console.log('info', info);
this.setState((cur) => {
return {
hasError: true
};
});
}
|
细节
某些错误,错误边界组件无法捕获
- 错误边界组件自身的错误
- 异步的错误,比如setTimeOut中的错误
- 事件中的错误,比如点击事件触发的错误
总结:仅处理渲染子组件期间的同步错误,上述处理不了的错误可以使用try,catch去处理
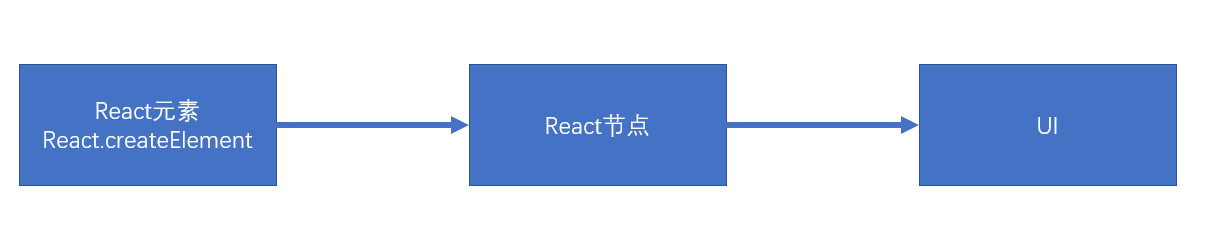
渲染原理
渲染:生成用于显示的对象,以及将这些对象形成真实的DOM对象
- React元素:React Element,通过React.createElement创建(语法糖:JSX)
- 例如:
<div><h1>标题</h1></div><App />
- React节点:专门用于渲染到UI界面的对象,React会通过React元素,创建React节点,ReactDOM一定是通过React节点来进行渲染的
- 节点类型:
- React DOM节点:创建该节点的React元素类型是一个字符串
- React 组件节点:创建该节点的React元素类型是一个函数或是一个类
- React 文本节点:由字符串、数字创建的
- React 空节点:由null、undefined、false、true
- React 数组节点:该节点由一个数组创建
- 真实DOM:通过document.createElement创建的dom元素
首次渲染(新节点渲染)
- 通过参数的值创建节点
- 根据不同的节点,做不同的事情
- 文本节点:通过document.createTextNode创建真实的文本节点
- 空节点:什么都不做
- 数组节点:遍历数组,将数组每一项递归创建节点(回到第1步进行反复操作,直到遍历结束)
- DOM节点:通过document.createElement创建真实的DOM对象,然后立即设置该真实DOM元素的各种属性,然后遍历对应React元素的children属性,递归操作(回到第1步进行反复操作,直到遍历结束)
- 组件节点
- 函数组件:调用函数(该函数必须返回一个可以生成节点的内容),将该函数的返回结果递归生成节点(回到第1步进行反复操作,直到遍历结束)
- 类组件:
- 创建该类的实例
- 立即调用对象的生命周期方法:static getDerivedStateFromProps
- 运行该对象的render方法,拿到节点对象(将该节点递归操作,回到第1步进行反复操作)
- 将该组件的componentDidMount加入到执行队列(先进先出,先进先执行),当整个虚拟DOM树全部构建完毕,并且将真实的DOM对象加入到容器中后,执行该队列
- 生成出虚拟DOM树之后,将该树保存起来,以便后续使用
- 将之前生成的真实的DOM对象,加入到容器中。
1
2
3
4
5
6
7
8
9
10
| const app = <div className="assaf">
<h1>
标题
{["abc", null, <p>段落</p>]}
</h1>
<p>
{undefined}
</p>
</div>;
ReactDOM.render(app, document.getElementById('root'));
|
以上代码生成的虚拟DOM树:

1
2
3
4
5
6
7
8
9
10
11
12
13
14
| function Comp1(props) {
return <h1>Comp1 {props.n}</h1>
}
function App(props) {
return (
<div>
<Comp1 n={5} />
</div>
)
}
const app = <App />;
ReactDOM.render(app, document.getElementById('root'));
|
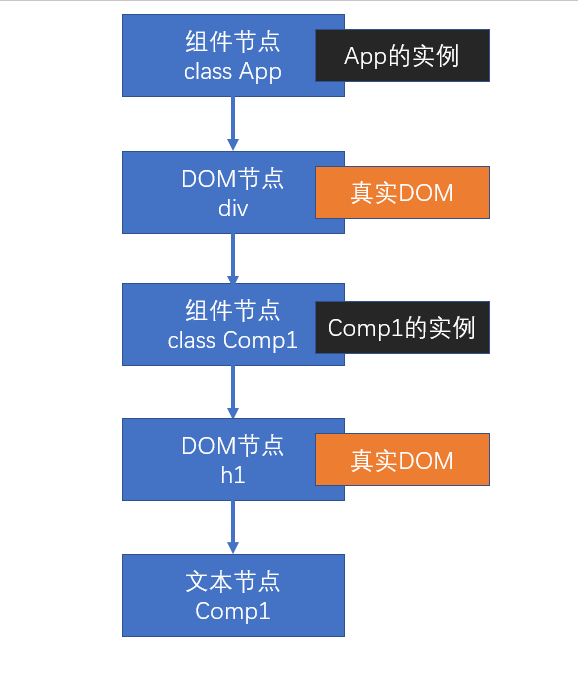
以上代码生成的虚拟DOM树:

1
2
3
4
5
6
7
8
9
10
11
12
13
14
15
16
17
18
19
20
| class Comp1 extends React.Component {
render() {
return (
<h1>Comp1</h1>
)
}
}
class App extends React.Component {
render() {
return (
<div>
<Comp1 />
</div>
)
}
}
const app = <App />;
ReactDOM.render(app, document.getElementById('root'));
|
以上代码生成的虚拟DOM树:
更新节点
更新的场景:
重新调用ReactDOM.render,完全重新生成节点树,触发根节点更新
- 触发根节点更新
在类组件的实例对象中调用setState,会导致该实例所在的节点更新
节点的更新
- 如果调用的是ReactDOM.render,进入根节点的对比(diff)更新
- 如果调用的是setState
- 运行生命周期函数,static getDerivedStateFromProps
- 运行shouldComponentUpdate,如果该函数返回false,终止当前流程
- 运行render,得到一个新的节点,进入该新的节点的对比更新
- 将生命周期函数getSnapshotBeforeUpdate加入执行队列,以待将来执行
- 将生命周期函数componentDidUpdate加入执行队列,以待将来执行
后续步骤:
- 更新虚拟DOM树
- 完成真实的DOM更新
- 依次调用执行队列中的componentDidMount
- 依次调用执行队列中的getSnapshotBeforeUpdate
- 依次调用执行队列中的componentDidUpdate
对比更新
将新产生的节点,对比之前虚拟DOM中的节点,发现差异,完成更新
问题:对比之前DOM树中哪个节点
React为了提高对比效率,做出以下假设
- 假设节点不会出现层次的移动(对比时,直接找到旧树中对应位置的节点进行对比)
- 不同的节点类型会生成不同的结构
- 相同的节点类型:节点本身类型相同,如果是由React元素生成,type值还必须一致
- 其他的,都属于不相同的节点类型
- 多个兄弟通过唯一标识(key)来确定对比的新节点
key值的作用:用于通过旧节点,寻找对应的新节点,如果某个旧节点有key值,则其更新时,会寻找相同层级中的相同key值的节点,进行对比。
key值应该在一个范围内唯一(兄弟节点中),并且应该保持稳定
找到了对比的目标
判断节点类型是否一致
根据不同的节点类型,做不同的事情
空节点:不做任何事情
DOM节点:
- 直接重用之前的真实DOM对象
- 将其属性的变化记录下来,以待将来统一完成更新(现在不会真正的变化)
- 遍历该新的React元素的子元素,递归对比更新
文本节点:
- 直接重用之前的真实DOM对象
- 将新的文本变化记录下来,将来统一完成更新
组件节点:
函数组件:重新调用函数,得到一个节点对象,进入递归对比更新
类组件:
- 重用之前的实例
- 调用生命周期方法getDerivedStateFromProps
- 调用生命周期方法shouldComponentUpdate,若该方法返回false,终止
- 运行render,得到新的节点对象,进入递归对比更新
- 将该对象的getSnapshotBeforeUpdate加入队列
- 将该对象的componentDidUpdate加入队列
数组节点:遍历数组进行递归对比更新
整体上,卸载旧的节点,全新创建新的节点
创建新节点
进入新节点的挂载流程
卸载旧节点
- 文本节点、DOM节点、数组节点、空节点、函数组件节点:直接放弃该节点,如果节点有子节点,递归卸载节点
- 类组件节点:
- 直接放弃该节点
- 调用该节点的componentWillUnMount函数
- 递归卸载子节点
没有找到对比的目标
新的DOM树中有节点被删除
新的DOM树中有节点添加
工具
严格模式
StrictMode(React.StrictMode),本质是一个组件,该组件不进行UI渲染(React.Fragment <> </>),它的作用是,在渲染内部组件时,发现不合适的代码。
- 识别不安全的生命周期
- 关于使用过时字符串 ref API 的警告
- 关于使用废弃的 findDOMNode 方法的警告
- 检测意外的副作用
- React要求,副作用代码仅出现在以下生命周期函数中
- ComponentDidMount
- ComponentDidUpdate
- ComponentWillUnMount
副作用:一个函数中,做了一些会影响函数外部数据的事情,例如:
- 异步处理
- 改变参数值
- setState
- 本地存储
- 改变函数外部的变量
相反的,如果一个函数没有副作用,则可以认为该函数是一个纯函数
在严格模式下,虽然不能监控到具体的副作用代码,但它会将不能具有副作用的函数调用两遍,以便发现问题。(这种情况,仅在开发模式下有效)
Profiler
性能分析工具
分析某一次或多次提交(更新),涉及到的组件的渲染时间
火焰图:得到某一次提交,每个组件总的渲染时间以及自身的渲染时间
排序图:得到某一次提交,每个组件自身渲染时间的排序
组件图:某一个组件,在多次提交中,自身渲染花费的时间
HOOK
HOOK是React16.8.0之后出现
组件:无状态组件(函数组件)、类组件
类组件中的麻烦:
this指向问题
繁琐的生命周期
其他问题
HOOK专门用于增强函数组件的功能(HOOK在类组件中是不能使用的),使之理论上可以成为类组件的替代品
官方强调:没有必要更改已经完成的类组件,官方目前没有计划取消类组件,只是鼓励使用函数组件
HOOK(钩子)本质上是一个函数(命名上总是以use开头),该函数可以挂载任何功能
HOOK种类:
- useState
- useEffect
- 其他…
State Hook
State Hook是一个在函数组件中使用的函数(useState),用于在函数组件中使用状态
useState
- 函数有一个参数,这个参数的值表示状态的默认值
- 函数的返回值是一个数组,该数组一定包含两项
一个函数组件中可以有多个状态,这种做法非常有利于横向切分关注点。
1
2
3
4
5
6
7
8
9
10
11
12
13
14
15
16
17
18
19
20
21
22
23
24
25
26
27
28
29
30
| import { useState } from 'react';
export default function App() {
let [count, setCount] = useState(0);
const [visible, setVisible] = useState(true);
const doHandleAdd = () => {
setCount(++count);
};
const doHandleReduce = () => {
setCount(--count);
};
const dohandleVisible = () => {
setVisible(!visible);
};
return (
<div>
<p style={{ display: visible ? 'block' : 'none' }}>
<button onClick={doHandleReduce}>-</button>
<span>{count}</span>
<button onClick={doHandleAdd}>+</button>
</p>
<button onClick={dohandleVisible}>显示/隐藏</button>
</div>
);
}
|
注意的细节
- useState最好写到函数的起始位置,便于阅读
- useState严禁出现在代码块(判断、循环)中
- useState返回的函数(数组的第二项),引用不变(节约内存空间)
- 使用函数改变数据,若数据和之前的数据完全相等(使用Object.is比较),不会导致重新渲染,以达到优化效率的目的。
- 使用函数改变数据,传入的值不会和原来的数据进行合并,而是直接替换。
- 如果要实现强制刷新组件
- 类组件:使用forceUpdate函数
- 函数组件:使用一个空对象的useState
- 如果某些状态之间没有必然的联系,应该分化为不同的状态,而不要合并成一个对象
- 和类组件的状态一样,函数组件中改变状态可能是异步的(在DOM事件中),多个状态变化会合并以提高效率,此时,不能信任之前的状态,而应该使用回调函数的方式改变状态。如果状态变化要使用到之前的状态,尽量传递函数。
Effect Hook
Effect Hook:用于在函数组件中处理副作用
副作用:
- ajax请求
- 计时器
- 其他异步操作
- 更改真实DOM对象
- 本地存储
- 其他会对外部产生影响的操作
函数:useEffect,该函数接收一个函数作为参数,接收的函数就是需要进行副作用操作的函数
举个例子:
1
2
3
4
5
6
7
8
9
10
11
12
13
14
15
16
17
18
19
20
21
22
23
| import React, { useState, useEffect } from 'react';
export default function App() {
let [count, setCount] = useState(0);
const doHandleAdd = () => {
setCount(++count);
};
useEffect(() => {
document.title = `计数器是${count}`;
});
return (
<div>
<span>{count}</span>
<button onClick={doHandleAdd}>+</button>
</div>
);
}
|
细节
副作用函数的运行时间点,是在页面完成真实的UI渲染之后。因此它的执行是异步的,并且不会阻塞浏览器
- 与类组件中componentDidMount和componentDidUpdate的区别
- componentDidMount和componentDidUpdate,更改了真实DOM,但是用户还没有看到UI更新,同步的。
- useEffect中的副作用函数,更改了真实DOM,并且用户已经看到了UI更新,异步的。
每个函数组件中,可以多次使用useEffect,但不要放入判断或循环等代码块中。
useEffect中的副作用函数,可以有返回值,返回值必须是一个函数,该函数叫做清理函数
- 该函数运行时间点,在每次运行副作用函数之前
- 首次渲染组件不会运行
- 组件被销毁时一定会运行
1
2
3
4
5
6
7
8
9
10
11
12
13
14
15
16
17
18
19
20
21
22
23
24
| useEffect(() => {
console.log('副作用函数');
stop();
const div = ref.current;
console.log(div);
let curTimes = 0;
const disX = props.left / 100;
const disY = props.top / 100;
timer = setInterval(() => {
curTimes++;
const newLeft = curTimes * disX;
const newTop = curTimes * disY;
div.style.left = newLeft + 'px';
div.style.top = newTop + 'px';
if (curTimes === 1000) {
stop();
}
}, 10);
return () => {
console.log('return');
stop();
};
});
|
useEffect函数,可以传递第二个参数
- 第二个参数是一个数组
- 数组中记录该副作用的依赖数据
- 当组件重新渲染后,只有依赖数据与上一次不一样的时,才会执行副作用
- 所以,当传递了依赖数据之后,如果数据没有发生变化
- 副作用函数仅在第一次渲染后运行
- 清理函数仅在卸载组件后运行
1
2
3
4
5
6
7
8
9
10
11
12
13
14
15
16
17
18
19
20
21
22
23
24
25
|
useEffect(() => {
console.log('副作用函数');
stop();
const div = ref.current;
console.log(div);
let curTimes = 0;
const disX = props.left / 1000;
const disY = props.top / 1000;
timer = setInterval(() => {
curTimes++;
const newLeft = curTimes * disX;
const newTop = curTimes * disY;
div.style.left = newLeft + 'px';
div.style.top = newTop + 'px';
if (curTimes === 1000) {
stop();
}
}, 10);
return () => {
console.log('return');
stop();
};
}, [props.left, props.top]);
|
副作用函数中,如果使用了函数上下文中的变量,则由于闭包的影响,会导致副作用函数中变量不会实时变化。
副作用函数在每次注册时,会覆盖掉之前的副作用函数,因此,尽量保持副作用函数稳定,否则控制起来会比较复杂。
自定义Hook
State Hook: useState
Effect Hook:useEffect
自定义Hook:将一些常用的、跨越多个组件的Hook功能,抽离出去形成一个函数,该函数就是自定义Hook,自定义Hook,由于其内部需要使用Hook功能,所以它本身也需要按照Hook的规则实现:
- 函数名必须以use开头
- 调用自定义Hook函数时,应该放到顶层
例如:
- 很多组件都需要在第一次加载完成后,获取所有学生数据
- 很多组件都需要在第一次加载完成后,启动一个计时器,然后在组件销毁时卸载
使用Hook的时候,如果没有严格按照Hook的规则进行,eslint的一个插件(eslint-plugin-react-hooks)会报出警告
Context Hook
用于获取上下文数据,使用hook写法如下
1
2
3
4
5
6
7
8
9
10
11
12
13
14
15
16
17
18
| import React, { useContext } from 'react';
const ctx = React.createContext();
function Test() {
const value = useContext(ctx);
return <h1>这里是Test,上下文的值是:{value}</h1>;
}
export default function App() {
return (
<div>
<ctx.Provider value='abc'>
<Test />
</ctx.Provider>
</div>
);
}
|
如果用之前的写法可能需要使用ctx.Consumer,如下
1
2
3
4
5
6
7
8
9
10
11
12
13
14
15
16
17
18
19
20
21
| import React from 'react';
const ctx = React.createContext();
function Test() {
return (
<ctx.Consumer>
{(value) => <h1>这里是Test,上下文的值是:{value}</h1>}
</ctx.Consumer>
);
}
export default function App() {
return (
<div>
<ctx.Provider value='abc'>
<Test />
</ctx.Provider>
</div>
);
}
|
Callback Hook
使用Callback Hook前因
1
2
3
4
5
6
7
8
9
10
11
12
13
14
15
16
17
18
19
20
21
22
23
24
25
26
27
28
29
30
31
32
33
34
35
36
37
38
39
40
41
42
43
44
45
46
47
48
49
50
51
52
53
54
55
56
57
| import React, { useState } from 'react';
class Test extends React.PureComponent {
render() {
console.log('Test Render');
return (
<div>
<h1>Test类组件</h1>
<h1>{this.props.text}</h1>
<button onClick={this.props.onClick}>改变文本</button>
</div>
);
}
}
function Parent() {
console.log('parent render');
const [txt, setTxt] = useState(123);
const [n, setN] = useState(0);
return (
<div>
<Test
text={txt}
onClick={() => {
setTxt(123);
}}
/>
<input
type='number'
value={n}
onChange={(e) => {
setN(parseInt(e.target.value));
}}
/>
</div>
);
}
export default function App() {
return (
<div>
<Parent />
</div>
);
}
|
解决方案
函数名:useCallback
用于得到一个固定引用值的函数,通常用它进行性能优化
useCallback:
该函数有两个参数:
- 函数,useCallback会固定该函数的引用,只要依赖项没有发生变化,则始终返回之前函数的地址
- 数组,记录依赖项
该函数返回:引用相对固定的函数地址
1
2
3
4
5
6
7
8
9
10
11
12
13
14
15
16
17
18
19
20
21
22
23
24
25
26
27
28
29
30
31
32
33
34
35
36
37
38
39
40
41
42
43
44
45
46
47
48
49
50
51
52
53
54
| import React, { useState, useCallback } from 'react';
class Test extends React.PureComponent {
render() {
console.log('Test Render');
return (
<div>
<h1>Test类组件</h1>
<h1>{this.props.text}</h1>
<button onClick={this.props.onClick}>改变文本</button>
</div>
);
}
}
function Parent() {
console.log('parent render');
const [txt, setTxt] = useState(123);
const [n, setN] = useState(0);
const handleClick = useCallback(() => {
setTxt(Math.random());
}, []);
return (
<div>
<Test text={txt} onClick={handleClick} />
<input
type='number'
value={n}
onChange={(e) => {
setN(parseInt(e.target.value));
}}
/>
</div>
);
}
export default function App() {
return (
<div>
<Parent />
</div>
);
}
|
Memo Hook
用于保持一些比较稳定的数据,通常用于性能优化
如果React元素本身的引用没有发生变化,一定不会重新渲染
上面说到使用useCallback,这里将两个方法做对比,以下是使用useMemo的用法
1
2
3
4
5
6
7
8
9
10
11
12
13
14
15
16
17
18
19
20
21
22
23
24
25
26
27
28
29
30
31
32
33
34
35
36
37
38
39
40
41
42
43
44
45
46
47
48
49
50
51
52
53
54
55
56
57
| import React, { useState, useMemo } from 'react';
class Test extends React.PureComponent {
render() {
console.log('Test Render');
return (
<div>
<h1>Test类组件</h1>
<h1>{this.props.text}</h1>
<button onClick={this.props.onClick}>改变文本</button>
</div>
);
}
}
function Parent() {
console.log('parent render');
const [txt, setTxt] = useState(123);
const [n, setN] = useState(0);
const handleClick = useMemo(() => {
return () => {
setTxt(txt + 1);
};
}, [txt]);
return (
<div>
<Test text={txt} onClick={handleClick} />
<input
type='number'
value={n}
onChange={(e) => {
setN(parseInt(e.target.value));
}}
/>
</div>
);
}
export default function App() {
return (
<div>
<Parent />
</div>
);
}
|
区别于useCallback,这里使用的是:
1
2
3
4
5
| useMemo(() => {
return () => {
setTxt(txt + 1);
};
}, [txt]);
|
useCallback返回的是一个函数地址,useMemo返回的是一个调用的函数内容,
例如,要渲染一个10000个列表,某个地方发生了变化,可能会导致整个组件重新渲染,这时可以使用useMemo,如果依赖项没有变化则不会重新渲染,如下:
1
2
3
4
5
6
7
8
9
10
11
12
13
14
15
16
17
18
19
20
21
22
23
24
25
26
27
28
29
30
31
32
33
34
| import React, { useState, useMemo } from 'react';
function Item(props) {
console.log('Item render');
return <li>{props.value}</li>;
}
export default function App() {
const [range] = useState({ min: 1, max: 1000 });
const [n, setN] = useState(0);
const list = useMemo(() => {
const list = [];
for (let i = range.min; i <= range.max; i++) {
list.push(<Item key={i} value={i}></Item>);
}
return list;
}, [range.min, range.max]);
return (
<>
<input
type='number'
value={n}
onChange={(e) => {
setN(parseInt(e.target.value));
}}
/>
<ul>{list}</ul>;
</>
);
}
|
Ref Hook
useRef函数:
- 一个参数:默认值
- 返回一个固定的对象,
{current: 值}
1
2
3
4
5
6
7
8
9
10
11
12
13
14
15
16
17
18
19
20
21
22
23
24
25
26
27
28
29
30
31
32
33
34
35
36
37
38
39
40
41
| import React, { useState, useRef, useEffect } from 'react';
export default function App() {
const inpRef = useRef();
const [n, setN] = useState(10);
const nRef = useRef(n);
useEffect(() => {
const timer = setInterval(() => {
nRef.current--;
setN(nRef.current);
if (nRef.current === 0) {
clearInterval(timer);
}
}, 1000);
return () => {
clearInterval(timer);
};
}, []);
return (
<div>
<input ref={inpRef} type='text' />
<button
onClick={() => {
console.log('Input的值', inpRef.current.value);
}}
>
得到input的值
</button>
<h1>{n}</h1>
</div>
);
}
|
如果我们需要一个状态,而且这个状态的改变不能触发组件的render,例如:dom, 本地存储等等,那我们都可以使用ref对象去储存它
ImperativeHandle Hook
函数:useImperativeHandleHook
比如要通过ref使用子函数组件中的某个方法,这里可以通过useImperativeHandle和ref,将方法在顶层通过ref.current获取并执行,如下:
1
2
3
4
5
6
7
8
9
10
11
12
13
14
15
16
17
18
19
20
21
22
23
24
25
26
27
28
29
30
31
32
33
34
35
36
37
38
39
40
41
42
43
44
45
46
47
48
49
50
51
52
53
54
55
| import React, { useImperativeHandle, useRef } from 'react';
function Test(props, ref) {
useImperativeHandle(
ref,
() => {
console.log('......x');
return {
method() {
console.log('Test method called');
}
};
},
[]
);
return (
<div>
<h1>Test Component</h1>
</div>
);
}
const TestWrapper = React.forwardRef(Test);
export default function App() {
const testRef = useRef();
return (
<div>
<TestWrapper ref={testRef} />
<button
onClick={() => {
testRef.current.method();
}}
>
执行Test函数组件中的method方法
</button>
</div>
);
}
|
LayoutEffect Hook
useEffect:浏览器渲染完成后,用户看到新的渲染结果之后
- 可能出现:某个dom操作已经完成了渲染,因为useEffect中的副作用操作是在渲染完成后执行,如果在这里使用了新的dom操作,就会导致界面可能出现快速的闪烁效果
例如:
1
2
3
4
5
6
7
8
9
10
11
12
13
14
15
16
17
18
19
20
21
22
23
24
25
26
27
| import React, { useState, useEffect, useRef } from 'react';
export default function App() {
const [n, setN] = useState(0);
const h1Ref = useRef();
useEffect(() => {
h1Ref.current.innerText = Math.random().toFixed(2);
console.log('random');
});
return (
<div>
<h1 ref={h1Ref}>{n}</h1>
<button
onClick={() => {
setN(n + 1);
console.log('+1', n);
}}
>
+1
</button>
</div>
);
}
|
useLayoutEffect:完成了DOM改动,但还没有呈现给用户,这个hook使用方法和useEffect一样,只是执行时间在渲染发生前。
结论:应该尽量使用useEffect,因为它不会导致渲染阻塞,如果出现了问题,再考虑使用useLayoutEffectHook
DebugValue Hook
useDebugValue:用于将自定义Hook的关联数据显示到调试栏
如果创建的自定义Hook通用性比较高,可以选择使用useDebugValue方便调试
1
2
3
4
5
6
7
8
9
10
11
12
13
14
15
16
17
18
| import React, { useState, , useEffect } from 'react';
function useStudent() {
const [students] = useState([{ 1: 'yeager', 2: 'mikasa' }]);
useDebugValue('学生集合');
return students;
}
export default function App() {
useState(0);
useState('yeager');
useEffect(() => {
console.log('useEffect');
}, []);
useStudent();
return <div>React Container</div>;
}
|
React动画
React动画库:react-transition-group
1
| yarn add react-transition-group
|
Transition
https://reactcommunity.org/react-transition-group/transition
文档中有各个变化阶段的回调函数的调用方法
CSSTransition
https://reactcommunity.org/react-transition-group/css-transition
当进入时,发生:
- 为CSSTransition内部的DOM根元素(后续统一称之为DOM元素)添加样式enter
- 在一下帧(enter样式已经完全应用到了元素),立即为该元素添加样式enter-active
- 当timeout结束后,去掉之前的样式,添加样式enter-done
当退出时,发生:
- 为CSSTransition内部的DOM根元素(后续统一称之为DOM元素)添加样式exit
- 在一下帧(exit样式已经完全应用到了元素),立即为该元素添加样式exit-active
- 当timeout结束后,去掉之前的样式,添加样式exit-done
设置classNames属性,可以指定类样式的名称
字符串:为类样式添加前缀
classNames={{
appear: 'my-appear',
appearActive: 'my-active-appear',
appearDone: 'my-done-appear',
enter: 'my-enter',
enterActive: 'my-active-enter',
enterDone: 'my-done-enter',
exit: 'my-exit',
exitActive: 'my-active-exit',
exitDone: 'my-done-exit',
}}
1
2
3
4
5
6
7
8
|
2. 对象:为每个类样式指定具体的名称(非前缀)
关于首次渲染时的类样式,appear、apear-active、apear-done,它和enter的唯一区别在于完成时,会同时加入apear-done和enter-done
还可以与Animate.css联用
|
yarn add animate.css
1
2
3
4
5
6
7
8
9
10
11
12
13
14
15
16
17
18
19
20
21
22
23
24
25
26
27
28
29
30
31
32
33
34
35
36
37
38
39
40
41
42
43
44
45
46
47
48
49
50
51
52
53
54
55
56
|
```jsx
import React, { useState } from 'react';
import { CSSTransition } from 'react-transition-group';
import './App3.css';
import 'animate.css';
function MyTransition({ visible, children }) {
return (
<CSSTransition
appear
mountOnEnter
in={visible}
timeout={1000}
classNames={{
exitActive: 'animate__bounceOutLeft',
exitDone: 'exit-done',
enterActive: 'animate__bounceInRight',
appearActive: 'animate__bounceInRight'
}}
>
{children}
</CSSTransition>
);
}
function Comp1() {
return <h1 className='title animate__animated fast'>组件1</h1>;
}
function Comp2() {
return <h1 className='title animate__animated fast'>组件2</h1>;
}
export default function App() {
const [showComp1, setShowComp1] = useState(true);
return (
<div className='container'>
<div className='comp-container'>
<MyTransition visible={showComp1}>
<Comp1 />
</MyTransition>
<MyTransition visible={!showComp1}>
<Comp2 />
</MyTransition>
</div>
<button
onClick={() => {
setShowComp1(!showComp1);
}}
>
切换显示状态
</button>
</div>
);
}
|
SwitchTransition
https://reactcommunity.org/react-transition-group/switch-transition
用于有秩序地切换内部组件
默认情况下:out-in
- 当key值改变时,会将之前的DOM根元素添加退出样式(exit,exit-active)
- 退出完成后,将该DOM元素移除
- 重新渲染内部DOM元素
- 为新渲染的DOM根元素添加进入样式(enter, enter-active, enter-done)
in-out:
- 重新渲染内部DOM元素,保留之前的元素
- 为新渲染的DOM根元素添加进入样式(enter, enter-active, enter-done)
- 将之前的DOM根元素添加退出样式(exit,exit-active)
- 退出完成后,将该DOM元素移除
该库寻找dom元素的方式,是使用已经过时的API:findDomNode,该方法可以找到某个组件下的DOM根元素
1
2
3
4
5
6
7
8
9
10
11
12
13
14
15
16
17
18
19
20
21
22
23
24
25
| import React, { useState } from 'react';
import { SwitchTransition, CSSTransition } from 'react-transition-group';
import './App.css';
export default function App() {
const [show1, setShow1] = useState(true);
return (
<div>
<SwitchTransition mode='in-out'>
<CSSTransition timeout={1000} key={show1}>
<h1>{show1 ? 'title1' : 'title2'}</h1>
</CSSTransition>
</SwitchTransition>
<button
onClick={() => {
setShow1(!show1);
}}
>
切换
</button>
</div>
);
}
|
引入animate.css可以类似如下使用
1
2
3
4
5
6
7
8
9
10
11
12
13
14
15
16
17
18
19
20
21
22
23
24
25
26
27
28
29
30
31
32
33
34
35
36
37
| import React, { useState } from 'react';
import { SwitchTransition, CSSTransition } from 'react-transition-group';
import './AppAnimate.css';
import 'animate.css';
export default function App() {
const [show1, setShow1] = useState(true);
return (
<div className='container'>
<SwitchTransition mode='out-in'>
<CSSTransition
appear
timeout={1000}
key={show1}
classNames={{
exit: 'animate__slideOutLeft',
enter: 'animate__slideInRight',
appearActive: 'animate__slideInRight'
}}
>
<h1 className='animate__animated fast'>
{show1 ? 'title1' : 'title2'}
</h1>
</CSSTransition>
</SwitchTransition>
<button
onClick={() => {
setShow1(!show1);
}}
>
切换
</button>
</div>
);
}
|
TransitionGroup
该组件的children,接收多个Transition或CSSTransition组件,该组件用于根据这些子组件的key值,控制他们的进入和退出状态
appear同上面用法,可以设置首次渲染时的动画;
component可以设置包裹children时的外层元素;
classname可以设置上面的外层元素的类名;
具体使用如下:
1
2
3
4
5
6
7
8
9
10
11
12
13
14
15
16
17
18
19
20
21
22
23
24
25
26
27
28
29
30
31
32
33
34
35
36
37
38
39
40
41
42
43
44
45
46
47
| import React, { useState } from 'react';
import { v4 as uuidv4 } from 'uuid';
import { TransitionGroup, CSSTransition } from 'react-transition-group';
import './App.css';
export default function App() {
const [tasksList, setTasksList] = useState([
{ id: uuidv4(), name: '任务1' },
{ id: uuidv4(), name: '任务2' }
]);
return (
<div>
<TransitionGroup appear component='ul' classname='abc'>
{tasksList.map((item, index) => {
return (
<CSSTransition timeout={3000} key={item.id}>
<div>
{item.name}
<button
onClick={() => {
setTasksList(
tasksList.filter((it) => {
return it.id !== item.id;
})
);
}}
>
删除
</button>
</div>
</CSSTransition>
);
})}
</TransitionGroup>
<button
onClick={() => {
const name = window.prompt('请输入新增任务名称');
setTasksList([...tasksList, { id: uuidv4(), name }]);
}}
>
添加一个任务
</button>
</div>
);
}
|
封装一个淡入淡出动画组件
详细代码见:“自定义动画组件”分支
React Router 概述
React路由
站点
无论是使用Vue,还是React,开发的单页应用程序,可能只是该站点的一部分(某一个功能块)
一个单页应用里,可能会划分为多个页面(几乎完全不同的页面效果)(组件)
如果要在单页应用中完成组件的切换,需要实现下面两个功能:
- 根据不同的页面地址,展示不同的组件(核心)
- 完成无刷新的地址切换
我们把实现了以上两个功能的插件,称之为路由
React Router
- react-router:路由核心库,包含诸多和路由功能相关的核心代码
- react-router-dom:利用路由核心库,结合实际的页面,实现跟页面路由密切相关的功能
如果是在页面中实现路由,需要安装react-router-dom库
1
| yarn add react-router-dom
|
路由两种模式
路由:根据不同的页面地址,展示不同的组件
url地址组成
例:https://www.react.com:443/news/1-2-1.html?a=1&b=2#abcdefg
- 协议名(schema):https
- 主机名(host):
www.react.com
- ip地址
- 预设值:localhost
- 域名
- 局域网中电脑名称
- 端口号(port):443
- 如果协议是http,端口号是80,则可以省略端口号
- 如果协议是https,端口号是443,则可以省略端口号
- 路径(path):/news/1-2-1.html
- 地址参数(search、query):?a=1&b=2
- 附带的数据
- 格式:属性名=属性值&属性名=属性值….
- 哈希(hash、锚点)
- 附带的数据
Hash Router 哈希路由
根据url地址中的哈希值来确定显示的组件
原因:hash的变化,不会导致页面刷新
这种模式的兼容性最好
Borswer History Router 浏览器历史记录路由
HTML5出现后,新增了History Api,从此以后,浏览器拥有了改变路径而不刷新页面的方式
History表示浏览器的历史记录,它使用栈的方式存储。
- history.length:获取栈中数据量
- history.pushState:向当前历史记录栈中加入一条新的记录
- 参数1:附加的数据,自定义的数据,可以是任何类型
- 参数2:页面标题,目前大部分浏览器不支持
- 参数3:新的地址
- history.replaceState:将当前指针指向的历史记录,替换为某个记录
- 参数1:附加的数据,自定义的数据,可以是任何类型
- 参数2:页面标题,目前大部分浏览器不支持
- 参数3:新的地址
根据页面的路径决定渲染哪个组件
路由组件
React-Router 为我们提供了两个重要组件
Router组件
它本身不做任何展示,仅提供路由模式配置,另外,该组件会产生一个上下文,上下文中会提供一些实用的对象和方法,供其他相关组件使用
HashRouter:该组件,使用hash模式匹配
1
2
3
4
5
6
7
8
9
10
11
| import React from 'react';
import { HashRouter } from 'react-router-dom';
export default function App() {
return (
<HashRouter>
<h1>React Router</h1>
</HashRouter>
);
}
|
BrowserRouter:该组件,使用BrowserHistory模式匹配
1
2
3
4
5
6
7
8
9
10
11
| import React from 'react';
import { BrowserRouter as Router } from 'react-router-dom';
export default function App() {
return (
<Router>
<h1>React Router</h1>
</Router>
);
}
|
通常情况下,Router组件只有一个,将该组件包裹整个页面
Route组件
根据不同的地址,展示不同的组件
重要属性(React Router v5.0.1,v6有所改变):
- path(v5.0.1):匹配的路径
- 默认情况下,不区分大小写,可以设置sensitive属性为true,来区分大小写
- 默认情况下,只匹配初始目录,如果要精确匹配,配置exact属性为true
- 如果不写path,则会匹配任意路径
- component(v5.0.1,v6为Component):匹配成功后要显示的组件
- children:
- 传递React元素,无论是否匹配,一定会显示children,并且会忽略component属性
- 传递一个函数,该函数有多个参数,这些参数来自于上下文,该函数返回react元素,则一定会显示返回的元素,并且忽略component属性
(v5.0.1)Route组件可以写到任意的地方,只要保证它是Router组件的后代元素
(v6)Route组件需要被Routes包裹
(v6):
1
2
3
4
5
6
7
8
9
10
11
12
13
14
15
16
17
18
19
20
21
22
23
24
25
26
27
28
29
30
| import React from 'react';
import { BrowserRouter as Router, Routes, Route } from 'react-router-dom';
function A() {
return <h1>组件A</h1>;
}
function B() {
return <h1>组件B</h1>;
}
function C() {
return <h1>组件C</h1>;
}
export default function App() {
return (
<Router>
<Routes>
<Route path='/a' Component={A} />
<Route path='/a/b' Component={B} />
<Route path='/a/c' Component={C} />
</Routes>
</Router>
);
}
|
Switch组件(React Router v5.0.1,v6已去除)
写到Switch组件中的Route组件,当匹配到第一个Route后,会立即停止匹配
由于Switch组件会循环所有子元素,然后让每个子元素去完成匹配,若匹配到,则渲染对应的组件,然后停止循环。因此,不能在Switch的子元素中使用除Route外的其他组件。
路由信息
Router组件会创建一个上下文,并且,向上下文中注入一些信息
该上下文对开发者是隐藏的,Route组件若匹配到了地址,则会将这些上下文中的信息作为属性传入对应的组件
history
它并不是window.history对象,我们利用该对象无刷新跳转地址
为什么没有直接使用history对象
- React-Router中有两种模式:Hash、History,如果直接使用window.history,只能支持一种模式
- 当使用windows.history.pushState方法时,没有办法收到任何通知,将导致React无法知晓地址发生了变化,结果导致无法重新渲染组件
- push:将某个新的地址入栈(历史记录栈)
- replace:将某个新的地址替换掉当前栈中的地址
- go: 与window.history一致
- forward: 与window.history一致
- back: 与window.history一致
location
与history.location完全一致,是同一个对象,但是,与window.location不同
location对象中记录了当前地址的相关信息
我们通常使用第三方库query-string,用于解析地址栏中的数据
match
该对象中保存了,路由匹配的相关信息
- isExact:事实上,当前的路径和路由配置的路径是否是精确匹配的
- params:获取路径规则中对应的数据
实际上,在书写Route组件的path属性时,可以书写一个string pattern(字符串正则)
react-router使用了第三方库:Path-to-RegExp,该库的作用是,将一个字符串正则转换成一个真正的正则表达式。
向某个页面传递数据的方式:
- 使用state:在push页面时,加入state
- 利用search:把数据填写到地址栏中的?后
- 利用hash:把数据填写到hash后
- params:把数据填写到路径中
非路由组件获取路由信息
某些组件,并没有直接放到Route中,而是嵌套在其他普通组件中,因此,它的props中没有路由信息,如果这些组件需要获取到路由信息,可以使用下面两种方式:
- 将路由信息从父组件一层一层传递到子组件
- 使用react-router提供的高阶组件withRouter,包装要使用的组件,该高阶组件会返回一个新组件,新组件将向提供的组件注入路由信息。
Redux核心概念
action reducer store
MVC
它是一个UI的解决方案,用于降低UI,以及UI关联的数据的复杂度。
传统的服务器端的MVC
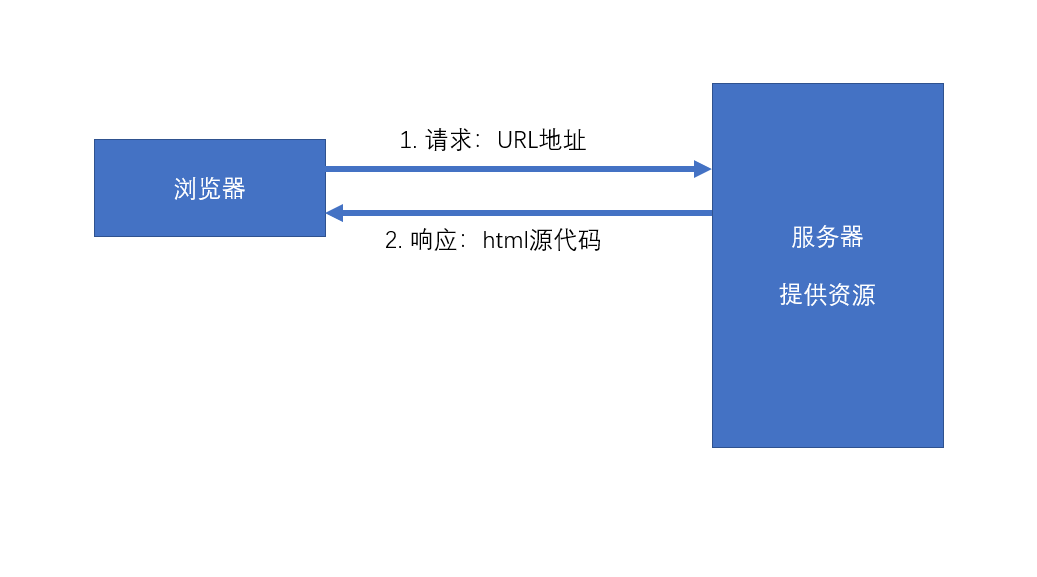
环境:
- 服务端需要响应一个完整的HTML
- 该HTML中包含页面需要的数据
- 浏览器仅承担渲染页面的作用
以上的这种方式叫做服务端渲染,即服务器端将完整的页面组装好之后,一起发送给客户端。
服务器端需要处理UI中要用到的数据,并且要将数据嵌入到页面中,最终生成一个完整的HTML页面响应。
为了降低处理这个过程的复杂度,出现了MVC模式。
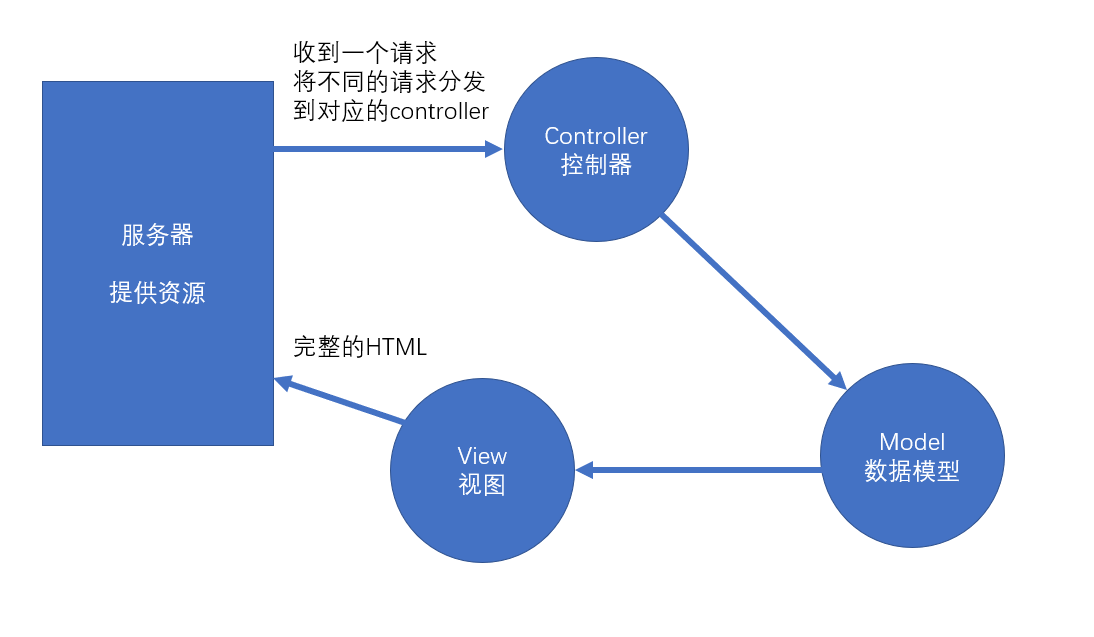
Controller: 处理请求,组装这次请求需要的数据
Model:需要用于UI渲染的数据模型
View:视图,用于将模型组装到界面中
前端MVC模式的困难
React解决了 数据 -> 视图 的问题
- 前端的controller要比服务器复杂很多,因为前端中的controller处理的是用户的操作,而用户的操作场景是复杂的。
- 对于那些组件化的框架(比如vue、react),它们使用的是单向数据流。若需要共享数据,则必须将数据提升到顶层组件,然后数据再一层一层传递,极其繁琐。 虽然可以使用上下文来提供共享数据,但对数据的操作难以监控,容易导致调试错误的困难,以及数据还原的困难。并且,若开发一个大中型项目,共享的数据很多,会导致上下文中的数据变得非常复杂。
比如,上下文中有如下格式的数据:
1
2
3
4
5
6
| value = {
users:[{},{},{}],
addUser: function(u){},
deleteUser: function(u){},
updateUser: function(u){}
}
|
前端需要一个独立的数据解决方案
Flux
Facebook提出的数据解决方案,它的最大历史意义,在于它引入了action的概念
action是一个普通的对象,用于描述要干什么。action是触发数据变化的唯一原因
store表示数据仓库,用于存储共享数据。还可以根据不同的action更改仓库中的数据
示例:
1
2
3
4
5
6
7
8
9
10
11
12
| var loginAction = {
type: "login",
payload: {
loginId:"admin",
loginPwd:"123123"
}
}
var deleteAction = {
type: "delete",
payload: 1
}
|
Redux
在Flux基础上,引入了reducer的概念
reducer:处理器,用于根据action来处理数据,处理后的数据会被仓库重新保存。
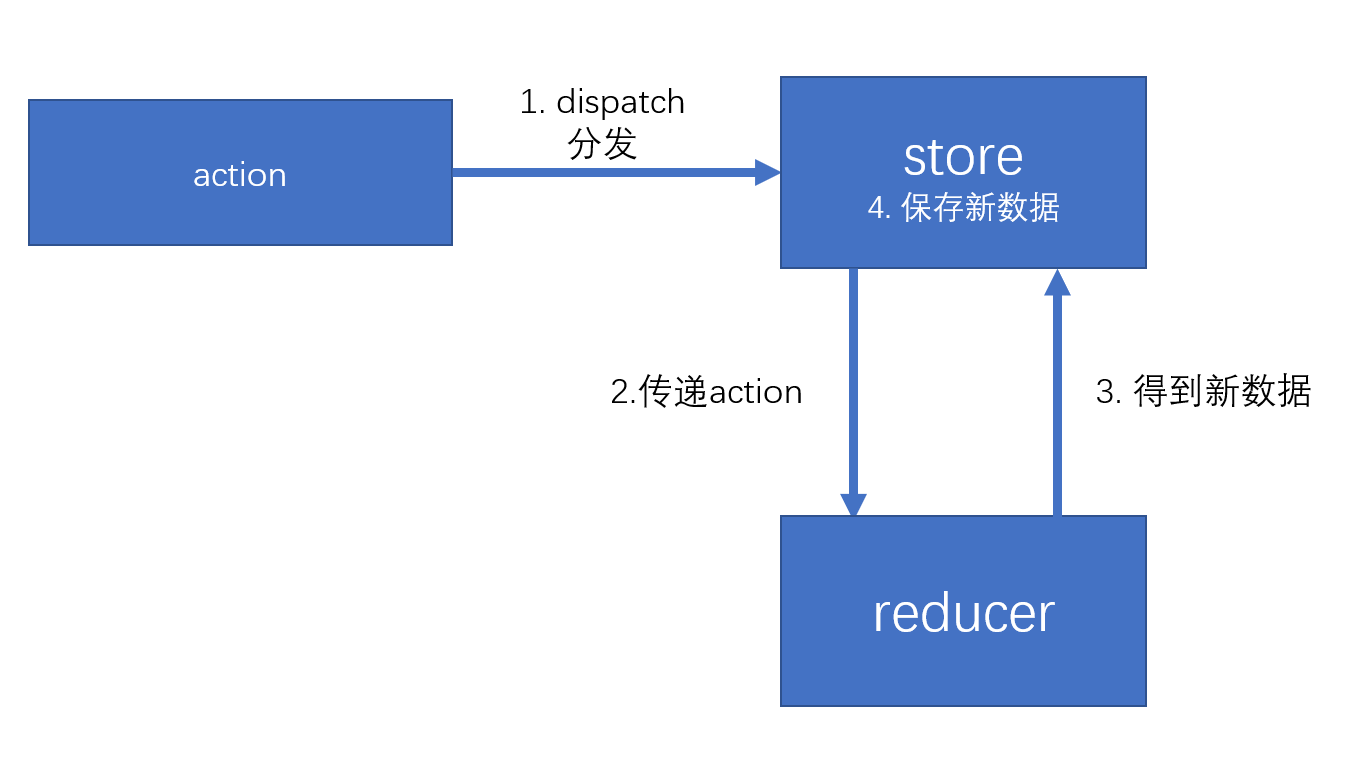
在React项目中简单使用Redux管理数据
安装Redux
Redux写法
1
2
3
4
5
6
7
8
9
10
11
12
13
14
15
16
17
18
19
20
21
22
23
24
25
26
27
28
| import { createStore } from 'redux';
function reducer(state, action) {
if (action.type === 'increase') {
return state + 1;
} else if (action.type === 'decrease') {
return state - 1;
}
return state;
}
const store = createStore(reducer, 10);
const action = {
type: 'increase'
};
store.dispatch(action);
|
最新版本推荐使用Redux Toolkit
1
| yarn add @reduxjs/toolkit
|
1
2
3
4
5
6
7
8
9
10
11
12
13
14
15
16
17
18
19
20
21
22
23
24
25
26
27
28
29
30
31
| import { createSlice, configureStore } from '@reduxjs/toolkit';
const numHandleSlice = createSlice({
name: 'numHandle',
initialState: {
value: 10
},
reducers: {
increase: (state) => {
state.value += 1;
},
decrease: (state) => {
state.value -= 1;
}
}
});
export const { increase, decrease } = numHandleSlice.actions;
const store = configureStore({
reducer: numHandleSlice.reducer
});
store.subscribe(() => console.log(store.getState()));
store.dispatch(increase());
store.dispatch(decrease());
store.dispatch(decrease());
|
Redux Action
Action是用来描述 “要做什么事情” 的作用
- action是一个plain-object(平面对象)
- 它的__proto__指向Object.prototype
- 通常,使用payload属性表示附加数据(没有强制要求)
- action中必须有type属性,该属性用于描述操作的类型
- 但是,没有对type的类型做出要求
- 在大型项目,由于操作类型非常多,为了避免硬编码(hard code),会将action的类型存放到一个或一些单独的文件中(样板代码)。
- 为了方面传递action,通常会使用action创建函数(action creator)来创建action
- action创建函数应为无副作用的纯函数
- 不能以任何形式改动参数
- 不可以有异步
- 不可以对外部环境中的数据造成影响
- 为了方便利用action创建函数来分发(触发)action,redux提供了一个函数
bindActionCreators,该函数用于增强action创建函数的功能,使它不仅可以创建action,并且创建后会自动完成分发。
1
2
3
4
5
6
7
8
9
10
11
12
| import { bindActionCreators } from 'redux';
const boundActions = bindActionCreators(numberActions, store.dispatch);
boundActions.getSetAction(22);
boundActions.getIncreaseAction();
boundActions.getDecreaseAction();
|
详细代码见分支“action的使用”
Redux Reducer
Reducer是用于改变数据的函数
一个数据仓库,有且仅有一个reducer,并且通常情况下,一个工程只有一个仓库,因此,一个系统,只有一个reducer
为了方便管理,通常会将reducer放到单独的文件中。
reducer被调用的时机
- 通过store.dispatch,分发了一个action,此时,会调用reducer
- 当创建一个store的时候(const store = createStore(reducer, 10)的时候),会调用一次reducer
- 可以利用这一点,用reducer初始化状态
- 创建仓库时,不传递任何默认状态(const store = createStore(reducer))
- 将reducer的参数state设置一个默认值(function reducer(state = 10, action) { … })
reducer内部通常使用switch来判断type值
1
2
3
4
5
6
7
8
9
10
11
12
13
14
| function reducer(state = 10, action) {
console.log('reducer运行了', state, action);
switch (action.type) {
case actionTypes.INCREASE:
return state + 1;
case actionTypes.DECREASE:
return state - 1;
case actionTypes.SET:
return action.payload;
default:
return state;
}
}
|
reducer必须是一个没有副作用的纯函数
- 为什么需要纯函数
- 纯函数有利于测试和调式
- 有利于还原数据
- 有利于将来和react结合时的优化
- 具体要求
- 不能改变参数,因此若要让状态变化,必须得到一个新的状态
- 不能有异步
- 不能对外部环境造成影响
由于在大中型项目中,操作比较复杂,数据结构也比较复杂,因此,需要对reducer进行细分。
- redux提供了方法,可以帮助我们更加方便的合并reducer
combineReducers: 合并reducer,得到一个新的reducer,该新的reducer管理一个对象,该对象中的每一个属性交给对应的reducer管理。
1
2
3
4
5
6
7
8
| import loginUserReducer from './loginUser';
import usersReducer from './users';
import { combineReducers } from 'redux';
export default combineReducers({
loginUser: loginUserReducer,
users: usersReducer
});
|
详细代码见分支”Reducer”
Redux Store
Store:用于保存数据
通过createStore方法创建的对象。
该对象的成员:
注意
图片资源需要导入使用
1
2
| import src1 from "./assets/1.jpg";
ReactDOM.render(<img src={src1} alt=""></img>, container);
|